Android 中的 botomnavigation view
哎哎哎:# t0]https://www . geeksforgeeks . org/bottomnavigation view-inand roid/
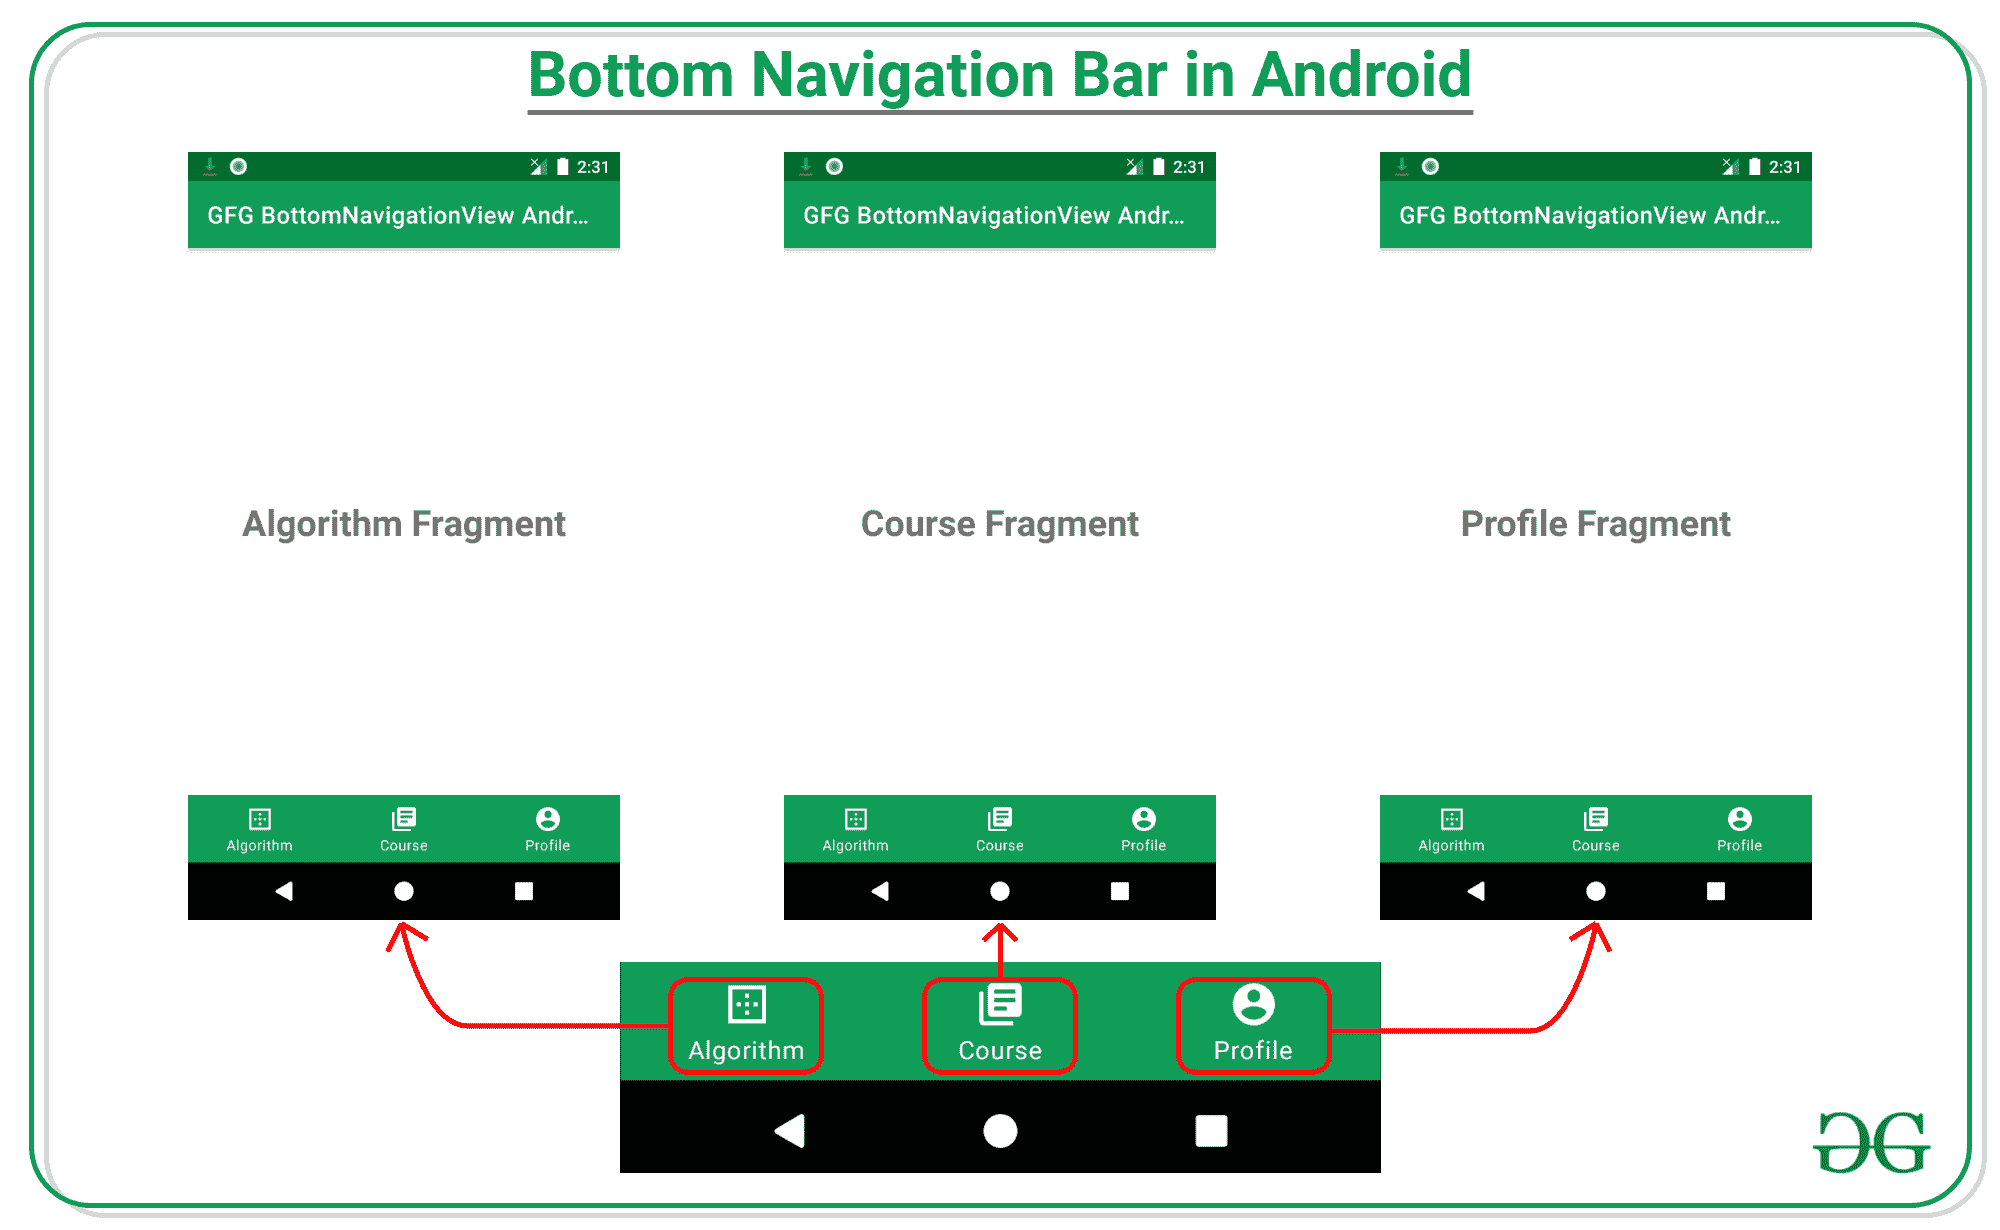
【bottom navigationview】让用户只需轻轻一点,就能轻松探索和切换顶级视图。应该至少有 3 个顶级视图,最多有 5 个。如果目的地超过 5 个,则使用 导航抽屉 。当用户点击图标时,它将相应地改变顶层视图。在音乐播放器应用程序中,在主页、专辑和收音机之间切换,可以使用。 Google plus app 使用这个小部件在不同视图之间切换。 Instagram 使用底部导航视图在提要、搜索、添加、喜欢和简介之间切换。这就是底部导航视图的样子。
底部导航视图的一些优缺点是:
优势
- 它是顶级目的地,可以从应用程序的任何地方访问。
- 它是一个材料设计组件。
- 易于使用和实施。
缺点
- 它仅在我们只有三到五个目的地时使用。
- 只能用于手机和平板电脑。
- 文本标签的长度应该更短。
- 当用户 90%以上的时间都在同一个窗口的一个应用中时,就应该使用它。
- 配合tableout使用可能会给用户造成混淆。
接近
- 在 build.gradle 文件中添加支持库,并在依赖项部分添加依赖项。该库具有用于底部导航视图的内置小部件,因此可以通过该库直接添加。
实现‘com . Google . Android . material:material:1 . 3 . 0-alpha 03’
- 现在创建一个新的安卓资源目录。右键点击 res 文件夹,选择安卓资源目录。确保选择资源类型作为菜单。现在创建 bottom_menu.xml 文件并添加以下代码。在这个文件中,我们为底部导航视图添加了标题、id 和菜单图标。下面是bottom _ menu . XML文件的代码。
可扩展标记语言
<?xml version="1.0" encoding="utf-8"?>
<menu xmlns:android="http://schemas.android.com/apk/res/android">
    <item
        android:id="@+id/algorithm"
        android:title="Algorithm"
        android:icon="@drawable/ic_algorithm"/>
    <item
        android:id="@+id/course"
        android:title="Course"
        android:icon="@drawable/ic_course"/>
    <item
        android:id="@+id/profile"
        android:title="Profile"
        android:icon="@drawable/ic_account"/>
</menu>
- 通过右键单击 java 包创建一个算法片段,选择新建- > 片段(空白)。
- 按照上述步骤进行课程片段和逻辑片段。
- 现在在 AlgorithmFragment.xml 文件中添加以下代码。此处布局中添加了一个文本视图。
- 下面是fragment _ algorithm文件的代码。
可扩展标记语言
<?xml version="1.0" encoding="utf-8"?>
<androidx.constraintlayout.widget.ConstraintLayout
    xmlns:android="http://schemas.android.com/apk/res/android"
    xmlns:app="http://schemas.android.com/apk/res-auto"
    xmlns:tools="http://schemas.android.com/tools"
    android:layout_width="match_parent"
    android:layout_height="match_parent"
    tools:context=".Fragments.AlgorithmFragment"
    android:orientation="vertical">

    <TextView
        android:layout_width="wrap_content"
        android:layout_height="wrap_content"
        android:text="Algorithm"
        android:textSize="30sp"
        android:textStyle="bold"
        app:layout_constraintBottom_toBottomOf="parent"
        app:layout_constraintEnd_toEndOf="parent"
        app:layout_constraintStart_toStartOf="parent"
        app:layout_constraintTop_toTopOf="parent" />
</androidx.constraintlayout.widget.ConstraintLayout>
- 现在在 CourseFragment.xml 文件中添加以下代码。这里一个文本视图被添加到布局中。
- 下面是 文件的代码。
可扩展标记语言
<?xml version="1.0" encoding="utf-8"?>
<androidx.constraintlayout.widget.ConstraintLayout
    xmlns:android="http://schemas.android.com/apk/res/android"
    xmlns:app="http://schemas.android.com/apk/res-auto"
    xmlns:tools="http://schemas.android.com/tools"
    android:layout_width="match_parent"
    android:layout_height="match_parent"
    tools:context=".Fragments.AlgorithmFragment"
    android:orientation="vertical">

    <TextView
        android:layout_width="wrap_content"
        android:layout_height="wrap_content"
        android:text="Course"
        android:textSize="30sp"
        android:textStyle="bold"
        app:layout_constraintBottom_toBottomOf="parent"
        app:layout_constraintEnd_toEndOf="parent"
        app:layout_constraintStart_toStartOf="parent"
        app:layout_constraintTop_toTopOf="parent" />
</androidx.constraintlayout.widget.ConstraintLayout>
- 现在在 fragment_profile.xml 文件中添加以下代码。这里一个文本视图被添加到布局中。
- 下面是T2 文件的代码。
可扩展标记语言
<?xml version="1.0" encoding="utf-8"?>
<androidx.constraintlayout.widget.ConstraintLayout
    xmlns:android="http://schemas.android.com/apk/res/android"
    xmlns:app="http://schemas.android.com/apk/res-auto"
    xmlns:tools="http://schemas.android.com/tools"
    android:layout_width="match_parent"
    android:layout_height="match_parent"
    tools:context=".Fragments.AlgorithmFragment"
    android:orientation="vertical">

    <TextView
        android:layout_width="wrap_content"
        android:layout_height="wrap_content"
        android:text="Algorithm"
        android:textSize="30sp"
        android:textStyle="bold"
        app:layout_constraintBottom_toBottomOf="parent"
        app:layout_constraintEnd_toEndOf="parent"
        app:layout_constraintStart_toStartOf="parent"
        app:layout_constraintTop_toTopOf="parent" />
</androidx.constraintlayout.widget.ConstraintLayout>
- 现在在 activity_main.xml 文件中添加以下代码。在这个文件中,我们将底部导航视图添加到布局中。
可扩展标记语言
<?xml version="1.0" encoding="utf-8"?>
<RelativeLayout
    xmlns:android="http://schemas.android.com/apk/res/android"
    android:layout_width="match_parent"
    android:layout_height="match_parent"
    xmlns:app="http://schemas.android.com/apk/res-auto">

    <FrameLayout
        android:id="@+id/fragment_container"
        android:layout_width="match_parent"
        android:layout_height="match_parent"
        android:layout_above="@id/bottom_navigation"
        />

    <com.google.android.material.bottomnavigation.BottomNavigationView
        android:id="@+id/bottom_navigation"
        android:layout_alignParentBottom="true"
        android:layout_gravity="bottom"
        android:layout_width="match_parent"
        android:layout_height="wrap_content"
        app:menu="@menu/bottom_menu"
        android:background="@color/colorPrimary"
        app:itemIconTint="@android:color/white"
        app:itemTextColor="@android:color/white"/>

</RelativeLayout>
- 现在在MainActivity.java文件中添加以下代码。在这个文件中,我们在导航中添加了来帮助在片段之间导航。当用户点击图标时,它将切换片段。
Java 语言(一种计算机语言,尤用于创建网站)
import androidx.annotation.NonNull;
import androidx.appcompat.app.AppCompatActivity;
import androidx.fragment.app.Fragment;

import android.os.Bundle;
import android.view.MenuItem;

import com.google.android.material.bottomnavigation.BottomNavigationView;

public class MainActivity extends AppCompatActivity {

    @Override
    protected void onCreate(Bundle savedInstanceState) {
        super.onCreate(savedInstanceState);
        setContentView(R.layout.activity_main);

        BottomNavigationView bottomNav = findViewById(R.id.bottom_navigation);
        bottomNav.setOnNavigationItemSelectedListener(navListener);

        // as soon as the application opens the first
           // fragment should be shown to the user
        // in this case it is algorithm fragment
        getSupportFragmentManager().beginTransaction().replace(R.id.fragment_container, new AlgorithmFragment()).commit();
    }

    private BottomNavigationView.OnNavigationItemSelectedListener navListener = new BottomNavigationView.OnNavigationItemSelectedListener() {
        @Override
        public boolean onNavigationItemSelected(@NonNull MenuItem item) {
            // By using switch we can easily get
            // the selected fragment
            // by using there id.
            Fragment selectedFragment = null;
            switch (item.getItemId()) {
                case R.id.algorithm:
                    selectedFragment = new AlgorithmFragment();
                    break;
                case R.id.course:
                    selectedFragment = new CourseFragment();
                    break;
                case R.id.profile:
                    selectedFragment = new ProfileFragment();
                    break;
            }
            // It will help to replace the
              // one fragment to other.
            getSupportFragmentManager()
                    .beginTransaction()
                    .replace(R.id.fragment_container, selectedFragment)
                    .commit();
            return true;
        }
    };
}
