安卓中使用 Firebase 进行电话号码验证
原文:https://www . geesforgeks . org/电话号码-验证-使用-firebase-in-android/
电话号码 Firebase 认证用于通过向用户手机发送短信的方式登录用户。用户使用短信中包含的一次性代码登录。下面给出了一个示例视频,以了解我们将在本文中做什么。请注意,我们将使用柯特林语言来实现这个项目。
注意:要在 Java 语言中实现,请参考本文安卓中的带电话号码 OTP 的 Firebase 认证
分步实施
第一步:创建新项目
要在安卓工作室创建新项目,请参考如何在安卓工作室创建/启动新项目。注意选择科特林作为编程语言。
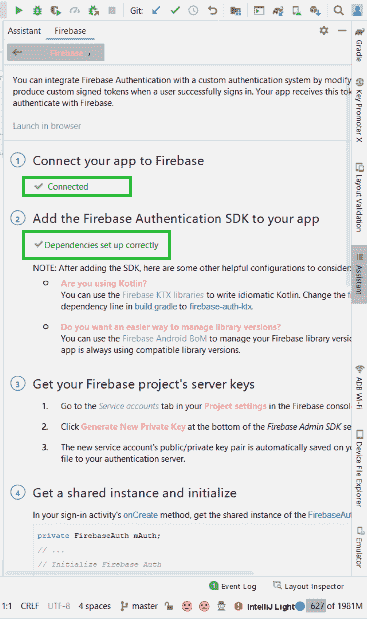
第二步:将项目连接到 Firebase。
第 3 步:向 build.gradle 文件添加依赖项,然后单击“立即同步”
实现平台(' com . Google . firebase:firebase-BOM:26 . 5 . 0 ')
实现' com . Google . firebase:firebase-auth-ktx '
第四步:创建两个新活动。
创建两个新活动。一个 PhoneNumberActivity.kt 带有布局文件activity _ phone _ number . XML,用于输入电话号码并启动认证过程。第二个 OtpActivity.kt 带有布局文件 activity_otp.xml ,用于输入从 firebase 接收的 otp。
第五步:使用布局
使用activity _ phone _ number . XML。转到activity _ phone _ number . XML文件并编写以下代码。
可扩展标记语言
<?xml version="1.0" encoding="utf-8"?>
<androidx.constraintlayout.widget.ConstraintLayout
    xmlns:android="http://schemas.android.com/apk/res/android"
    xmlns:app="http://schemas.android.com/apk/res-auto"
    xmlns:tools="http://schemas.android.com/tools"
    android:layout_width="match_parent"
    android:layout_height="match_parent"
    tools:context=".PhoneNumberActivity">

    <!--This will be used to enter the phone number-->
    <EditText
        android:id="@+id/et_phone_number"
        android:layout_width="match_parent"
        android:layout_height="wrap_content"
        android:layout_marginStart="20dp"
        android:layout_marginTop="200dp"
        android:layout_marginEnd="20dp"
        android:layout_marginBottom="20dp"
        android:ems="10"
        android:hint="Enter Phone Number"
        android:inputType="phone"
        app:layout_constraintEnd_toEndOf="parent"
        app:layout_constraintStart_toStartOf="parent"
        app:layout_constraintTop_toTopOf="parent"
        tools:layout_editor_absoluteY="85dp" />

      <!--On click of this button OTP will be send to phone-->
    <Button
        android:id="@+id/button_otp"
        android:layout_width="wrap_content"
        android:layout_height="wrap_content"
        android:layout_marginTop="20dp"
        android:text="Send OTP"
        app:layout_constraintEnd_toEndOf="parent"
        app:layout_constraintStart_toStartOf="parent"
        app:layout_constraintTop_toBottomOf="@+id/et_phone_number" />

</androidx.constraintlayout.widget.ConstraintLayout>
使用 activity_otp.xml. 转到 activity_otp.xml 文件并编写以下代码。
可扩展标记语言
<?xml version="1.0" encoding="utf-8"?>
<androidx.constraintlayout.widget.ConstraintLayout
    xmlns:android="http://schemas.android.com/apk/res/android"
    xmlns:app="http://schemas.android.com/apk/res-auto"
    xmlns:tools="http://schemas.android.com/tools"
    android:layout_width="match_parent"
    android:layout_height="match_parent"
    tools:context=".OtpActivity">

    <TextView
        android:id="@+id/tv_otp"
        android:layout_width="wrap_content"
        android:layout_height="wrap_content"
        android:layout_marginTop="200dp"
        android:text="Enter OTP"
        android:textSize="20sp"
        app:layout_constraintLeft_toLeftOf="parent"
        app:layout_constraintRight_toRightOf="parent"
        app:layout_constraintTop_toTopOf="parent"
        />

      <!--We will use it to enter OTP after we receive OTP-->
    <EditText
        android:id="@+id/et_otp"
        android:layout_width="match_parent"
        android:layout_height="wrap_content"
        android:layout_margin="20dp"
        android:hint="Enter OTP"
        app:layout_constraintLeft_toLeftOf="parent"
        app:layout_constraintRight_toRightOf="parent"
        app:layout_constraintTop_toBottomOf="@id/tv_otp" />

    <!--On click of this button final authentication will start-->
    <Button
        android:id="@+id/login"
        android:layout_width="wrap_content"
        android:layout_height="wrap_content"
        android:text="Login"
        app:layout_constraintLeft_toLeftOf="parent"
        app:layout_constraintRight_toRightOf="parent"
        app:layout_constraintTop_toBottomOf="@id/et_otp" />

</androidx.constraintlayout.widget.ConstraintLayout>
使用 activity_main.xml 。转到 activity_main.xml 文件并编写以下代码。这是验证完成后我们到达的最后一个活动。
可扩展标记语言
<?xml version="1.0" encoding="utf-8"?>
<androidx.constraintlayout.widget.ConstraintLayout
    xmlns:android="http://schemas.android.com/apk/res/android"
    xmlns:app="http://schemas.android.com/apk/res-auto"
    xmlns:tools="http://schemas.android.com/tools"
    android:layout_width="match_parent"
    android:layout_height="match_parent"
    tools:context=".MainActivity">

    <TextView
        android:layout_width="wrap_content"
        android:layout_height="wrap_content"
        android:text="Welcome To GFG!!"
        android:textSize="22sp"
        android:textColor="@color/black"
        app:layout_constraintBottom_toBottomOf="parent"
        app:layout_constraintLeft_toLeftOf="parent"
        app:layout_constraintRight_toRightOf="parent"
        app:layout_constraintTop_toTopOf="parent" />

</androidx.constraintlayout.widget.ConstraintLayout>
第 6 步:使用 PhoneNumberActivity.kt 文件
转到 PhoneNumberActivity.kt 文件,参考以下代码。下面是 PhoneNumberActivity.kt 文件的代码。代码中添加了注释,以更详细地理解代码。
我的锅
import android.content.Intent
import androidx.appcompat.app.AppCompatActivity
import android.os.Bundle
import android.util.Log
import android.widget.Button
import android.widget.EditText
import android.widget.Toast
import com.google.firebase.FirebaseException
import com.google.firebase.auth.FirebaseAuth
import com.google.firebase.auth.PhoneAuthCredential
import com.google.firebase.auth.PhoneAuthOptions
import com.google.firebase.auth.PhoneAuthProvider
import java.util.concurrent.TimeUnit

class PhoneNumberActivity : AppCompatActivity() {

    // this stores the phone number of the user
    var number : String =""

    // create instance of firebase auth
    lateinit var auth: FirebaseAuth

      // we will use this to match the sent otp from firebase
    lateinit var storedVerificationId:String
    lateinit var resendToken: PhoneAuthProvider.ForceResendingToken
    private lateinit var callbacks: PhoneAuthProvider.OnVerificationStateChangedCallbacks

    override fun onCreate(savedInstanceState: Bundle?) {
        super.onCreate(savedInstanceState)
        setContentView(R.layout.activity_phone_number)

        auth=FirebaseAuth.getInstance()

        // start verification on click of the button
        findViewById<Button>(R.id.button_otp).setOnClickListener {
            login()
        }

        // Callback function for Phone Auth
        callbacks = object : PhoneAuthProvider.OnVerificationStateChangedCallbacks() {

            // This method is called when the verification is completed
            override fun onVerificationCompleted(credential: PhoneAuthCredential) {
                startActivity(Intent(applicationContext, MainActivity::class.java))
                finish()
                Log.d("GFG" , "onVerificationCompleted Success")
            }

            // Called when verification is failed add log statement to see the exception
            override fun onVerificationFailed(e: FirebaseException) {
                Log.d("GFG" , "onVerificationFailed  $e")
            }

            // On code is sent by the firebase this method is called
            // in here we start a new activity where user can enter the OTP
            override fun onCodeSent(
                verificationId: String,
                token: PhoneAuthProvider.ForceResendingToken
            ) {
                Log.d("GFG","onCodeSent: $verificationId")
                storedVerificationId = verificationId
                resendToken = token

                // Start a new activity using intent
                // also send the storedVerificationId using intent
                // we will use this id to send the otp back to firebase
                val intent = Intent(applicationContext,OtpActivity::class.java)
                intent.putExtra("storedVerificationId",storedVerificationId)
                startActivity(intent)
                finish()
            }
        }
    }

    private fun login() {
        number = findViewById<EditText>(R.id.et_phone_number).text.trim().toString()

        // get the phone number from edit text and append the country cde with it
        if (number.isNotEmpty()){
            number = "+91$number"
            sendVerificationCode(number)
        }else{
            Toast.makeText(this,"Enter mobile number", Toast.LENGTH_SHORT).show()
        }
    }

    // this method sends the verification code
      // and starts the callback of verification
    // which is implemented above in onCreate
    private fun sendVerificationCode(number: String) {
        val options = PhoneAuthOptions.newBuilder(auth)
            .setPhoneNumber(number) // Phone number to verify
            .setTimeout(60L, TimeUnit.SECONDS) // Timeout and unit
            .setActivity(this) // Activity (for callback binding)
            .setCallbacks(callbacks) // OnVerificationStateChangedCallbacks
            .build()
        PhoneAuthProvider.verifyPhoneNumber(options)
        Log.d("GFG" , "Auth started")
    }
}
步骤 7:使用 OtpActivity.kt 文件
转到 OtpActivity.kt 文件,参考以下代码。下面是 OtpActivity.kt 文件的代码。代码中添加了注释,以更详细地理解代码。
我的锅
import android.content.Intent
import androidx.appcompat.app.AppCompatActivity
import android.os.Bundle
import android.widget.Button
import android.widget.EditText
import android.widget.Toast
import com.google.firebase.auth.FirebaseAuth
import com.google.firebase.auth.FirebaseAuthInvalidCredentialsException
import com.google.firebase.auth.PhoneAuthCredential
import com.google.firebase.auth.PhoneAuthProvider

class OtpActivity : AppCompatActivity() {

    // get reference of the firebase auth
    lateinit var auth: FirebaseAuth

    override fun onCreate(savedInstanceState: Bundle?) {
        super.onCreate(savedInstanceState)
        setContentView(R.layout.activity_otp)

        auth=FirebaseAuth.getInstance()

        // get storedVerificationId from the intent
        val storedVerificationId= intent.getStringExtra("storedVerificationId")

        // fill otp and call the on click on button
        findViewById<Button>(R.id.login).setOnClickListener {
            val otp = findViewById<EditText>(R.id.et_otp).text.trim().toString()
            if(otp.isNotEmpty()){
                val credential : PhoneAuthCredential = PhoneAuthProvider.getCredential(
                    storedVerificationId.toString(), otp)
                signInWithPhoneAuthCredential(credential)
            }else{
                Toast.makeText(this,"Enter OTP", Toast.LENGTH_SHORT).show()
            }
        }
    }
    // verifies if the code matches sent by firebase
    // if success start the new activity in our case it is main Activity
    private fun signInWithPhoneAuthCredential(credential: PhoneAuthCredential) {
        auth.signInWithCredential(credential)
            .addOnCompleteListener(this) { task ->
                if (task.isSuccessful) {
                    val intent = Intent(this , MainActivity::class.java)
                    startActivity(intent)
                    finish()
                } else {
                    // Sign in failed, display a message and update the UI
                    if (task.exception is FirebaseAuthInvalidCredentialsException) {
                        // The verification code entered was invalid
                        Toast.makeText(this,"Invalid OTP", Toast.LENGTH_SHORT).show()
                    }
                }
            }
    }
}
第八步:转到 AndroidManifest.xml,添加如下代码
可扩展标记语言
<?xml version="1.0" encoding="utf-8"?>
<manifest xmlns:android="http://schemas.android.com/apk/res/android"
    package="com.geeksforgeeks.phoneauth">

    <uses-permission android:name="android.permission.INTERNET"/>

    <application
        android:allowBackup="true"
        android:icon="@mipmap/ic_launcher"
        android:label="@string/app_name"
        android:roundIcon="@mipmap/ic_launcher_round"
        android:supportsRtl="true"
        android:theme="@style/Theme.PhoneAuth">
        <activity android:name=".OtpActivity"></activity>
        <activity android:name=".PhoneNumberActivity">
            <intent-filter>
                <action android:name="android.intent.action.MAIN" />

                <category android:name="android.intent.category.LAUNCHER" />
            </intent-filter>

        </activity>
        <activity android:name=".MainActivity">

        </activity>
    </application>

</manifest>
第九步:为你的项目启用安卓设备检查应用编程接口
在谷歌云控制台中,为您的项目启用安卓设备检查应用编程接口。将使用默认的防火墙应用编程接口密钥,并且需要被允许访问设备检查应用编程接口。

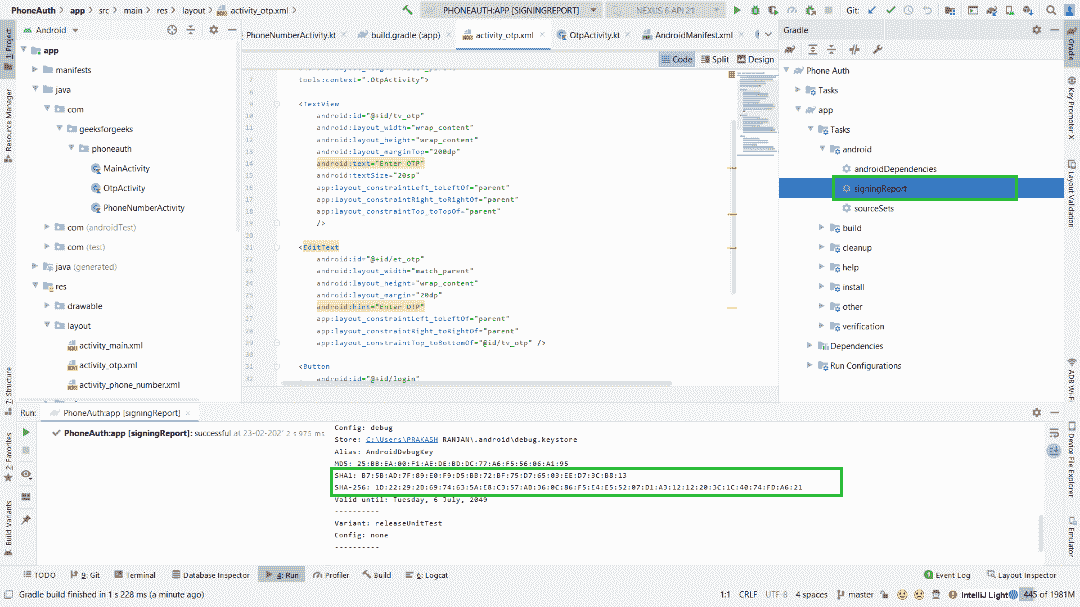
第十步:将安卓工作室的 SHA 键添加到 Firebase
从您的项目中复制 SHA1 和 SHA-256 键,并将其粘贴到 firebase 控制台。下面是引导你的截图。
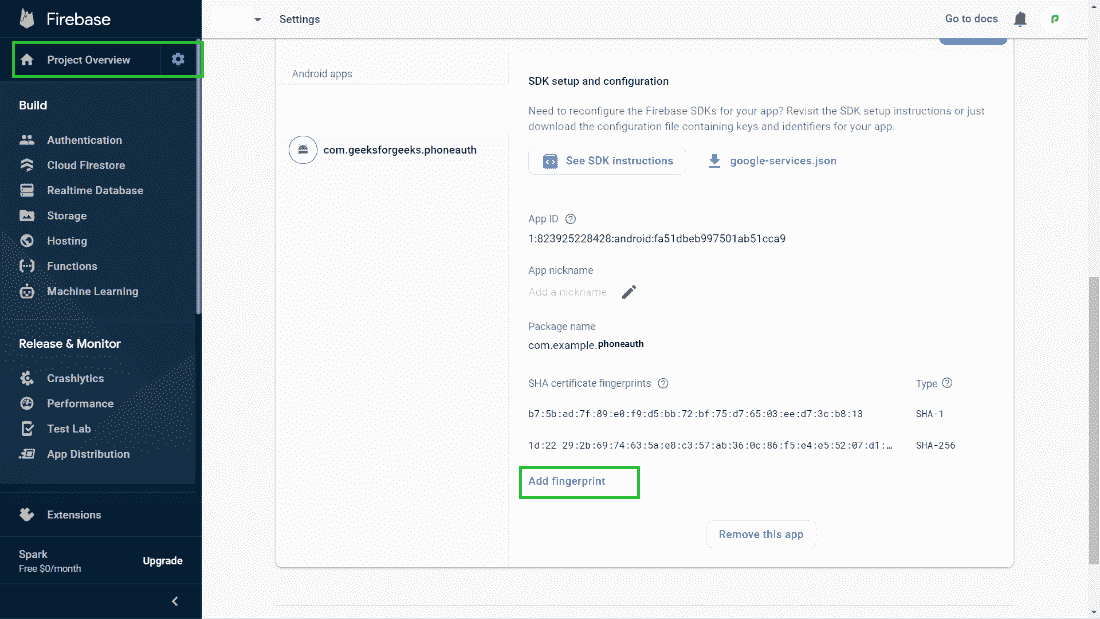
在 Firebase 控制台转到项目概述- >项目设置,点击添加指纹按钮,添加你从 Firebase 复制的 SHA 键
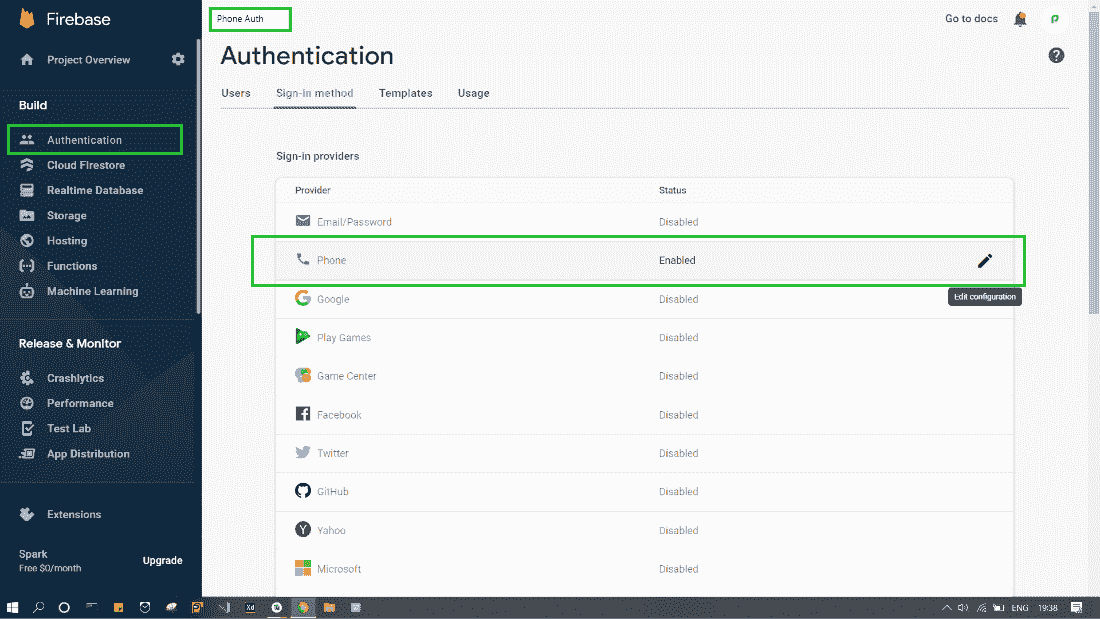
步骤 11:为您的 Firebase 项目启用电话号码登录
在 Firebase 控制台中选择您的项目,打开认证部分。在“登录方法”页面上,启用电话号码登录方法。
输出:
Github 回购 这里 。
