安卓通知,示例
通知是安卓用户界面元素中可见或可用的一种消息、警报或应用程序状态(可能在后台运行)。该应用程序可能正在后台运行,但用户没有使用。通知的目的是通知用户由用户或系统在应用程序中启动的进程。这篇文章可以帮助那些努力为发展目的创建通知的人。
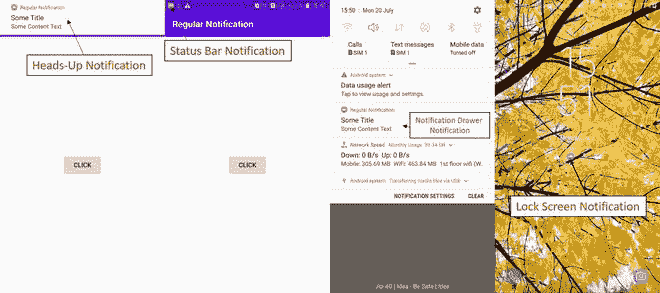
通知可以是各种格式和设计,这取决于开发人员。一般来说,人们一定目睹了这四种类型的通知:
- 状态栏通知(显示在与当前时间、电池百分比相同的布局中)
- 通知抽屉通知(出现在下拉菜单中)
- 抬头通知(出现在覆盖屏幕上,例如:Whatsapp 通知、OTP 消息)
- 锁屏通知(我猜你知道)
在本文中,我们将讨论如何在 Kotlin 中生成通知。
逐步实施
第一步:创建新项目
要在安卓工作室创建新项目,请参考如何在安卓工作室创建/启动新项目。注意选择科特林作为编程语言。
步骤 2:使用 activity_main.xml 文件
转到 activity_main.xml 文件,参考以下代码。在这一步中,我们将设计布局页面。在这里,我们将使用 RelativeLayout 从 Kotlin 文件中获取滚动视图。下面是 activity_main.xml 文件的代码。
可扩展标记语言
<?xml version="1.0" encoding="utf-8"?>
<RelativeLayout
    xmlns:android="http://schemas.android.com/apk/res/android"
    xmlns:tools="http://schemas.android.com/tools"
    android:layout_width="match_parent"
    android:layout_height="match_parent"
    tools:context=".MainActivity">

    <Button
        android:id="@+id/btn"
        android:layout_width="wrap_content"
        android:layout_height="wrap_content"
        android:layout_centerInParent="true"
        android:text="Send Notification" />

</RelativeLayout>
第三步:创建一个新的空活动
将活动命名为通知后。当有人点击通知时,此活动将在我们的应用程序中打开,即用户将被重定向到此页面。下面是activity _ after _ notification . XML文件的代码。
可扩展标记语言
<?xml version="1.0" encoding="utf-8"?>
<RelativeLayout
    xmlns:android="http://schemas.android.com/apk/res/android"
    xmlns:tools="http://schemas.android.com/tools"
    android:layout_width="match_parent"
    android:layout_height="match_parent"
    tools:context=".afterNotification">

    <TextView
        android:id="@+id/textView"
        android:layout_width="wrap_content"
        android:layout_height="wrap_content"
        android:layout_centerInParent="true"
        android:text="Welcome To GeeksforGeeks"
        android:textSize="15sp"
        android:textStyle="bold" />

</RelativeLayout>
注 1 : 如果不配置通知通道,就无法为安卓 API > =26 的应用构建通知。对他们来说,生成通知通道是强制性的。带 API < 26 的应用不需要通知通道,只需要通知构建器。每个通道都应该有一个特定的行为,适用于作为其一部分的所有通知。因此,每个频道都有一个频道标识,该标识基本上作为该频道的唯一标识符,如果用户想要区分特定的通知频道,这将是有用的。相比之下,通知构建器提供了一种便捷的方式来设置通知的各个字段,并使用平台的通知布局模板生成内容视图,但无法针对特定的通知渠道。
注 2: 如果您在此之前参考过任何其他文档或任何其他博客,您可能会注意到他们呼吁实现以下依赖关系【com . Android . support:support-compat:28 . 0 . 0】。我个人经历的是,没有必要去执行它,没有这个事情也会走得很远很好。
步骤 5:使用 MainActivity.kt 文件
转到 MainActivity.kt 文件,参考以下代码。下面是 MainActivity.kt 文件的代码。代码中添加了注释,以更详细地理解代码。
我的锅
import android.app.Notification
import android.app.NotificationChannel
import android.app.NotificationManager
import android.app.PendingIntent
import android.content.Context
import android.content.Intent
import android.graphics.BitmapFactory
import android.graphics.Color
import android.os.Build
import android.os.Bundle
import android.widget.Button
import android.widget.RemoteViews
import androidx.appcompat.app.AppCompatActivity

class MainActivity : AppCompatActivity() {

    // declaring variables
    lateinit var notificationManager: NotificationManager
    lateinit var notificationChannel: NotificationChannel
    lateinit var builder: Notification.Builder
    private val channelId = "i.apps.notifications"
    private val description = "Test notification"

    override fun onCreate(savedInstanceState: Bundle?) {
        super.onCreate(savedInstanceState)
        setContentView(R.layout.activity_main)

        // accessing button
        val btn = findViewById<Button>(R.id.btn)

        // it is a class to notify the user of events that happen.
        // This is how you tell the user that something has happened in the
        // background.
        notificationManager = getSystemService(Context.NOTIFICATION_SERVICE) as NotificationManager

        // onClick listener for the button
        btn.setOnClickListener {

            // pendingIntent is an intent for future use i.e after
            // the notification is clicked, this intent will come into action
            val intent = Intent(this, afterNotification::class.java)

            // FLAG_UPDATE_CURRENT specifies that if a previous
            // PendingIntent already exists, then the current one
            // will update it with the latest intent
            // 0 is the request code, using it later with the
            // same method again will get back the same pending
            // intent for future reference
            // intent passed here is to our afterNotification class
            val pendingIntent = PendingIntent.getActivity(this, 0, intent, PendingIntent.FLAG_UPDATE_CURRENT)

            // RemoteViews are used to use the content of
            // some different layout apart from the current activity layout
            val contentView = RemoteViews(packageName, R.layout.activity_after_notification)

            // checking if android version is greater than oreo(API 26) or not
            if (Build.VERSION.SDK_INT >= Build.VERSION_CODES.O) {
                notificationChannel = NotificationChannel(channelId, description, NotificationManager.IMPORTANCE_HIGH)
                notificationChannel.enableLights(true)
                notificationChannel.lightColor = Color.GREEN
                notificationChannel.enableVibration(false)
                notificationManager.createNotificationChannel(notificationChannel)

                builder = Notification.Builder(this, channelId)
                        .setContent(contentView)
                        .setSmallIcon(R.drawable.ic_launcher_background)
                        .setLargeIcon(BitmapFactory.decodeResource(this.resources, R.drawable.ic_launcher_background))
                        .setContentIntent(pendingIntent)
            } else {

                builder = Notification.Builder(this)
                        .setContent(contentView)
                        .setSmallIcon(R.drawable.ic_launcher_background)
                        .setLargeIcon(BitmapFactory.decodeResource(this.resources, R.drawable.ic_launcher_background))
                        .setContentIntent(pendingIntent)
            }
            notificationManager.notify(1234, builder.build())
        }
    }
}
至此,我们已经成功地为我们的应用程序创建了一个“通知”。请注意,上面代码中列出的参数是必需的,缺少任何单个参数都可能导致应用程序崩溃或无法启动。内容标题、内容文本、小图标是可定制的参数,但也是强制性的。人们可以根据需要改变他们的价值观。
