如何使用 TensorFlow 为安卓创建自定义模型?
原文:https://www . geeksforgeeks . org/如何使用 tensorflow/为安卓创建定制模型/
Tensorflow 是机器学习的开源库。在安卓系统中,我们的计算能力和资源都很有限。因此,我们正在使用 TensorFlow 灯,这是专门为在功率有限的设备上运行而设计的。在这篇文章中,我们将看到一个名为 iris 数据集的分类示例。数据集包含 3 个类,每个类 50 个实例,其中每个类指的是鸢尾植物的类型。
属性信息:
- 萼片长厘米
- 萼片宽度厘米
- 花瓣长度(厘米)
- 花瓣宽度(厘米)
根据输入的信息,我们将预测该植物是濑户鸢尾、云芝还是弗吉尼亚鸢尾。更多信息可以参考本链接。
逐步实施
第一步:
从这个(https://archive . ics . UCI . edu/ml/机器学习-数据库/iris/ )链接下载 iris 数据集(文件名:iris.data )。
第二步:
在 Jupyter 笔记本中创建一个名为 iris 的新 python 文件。将 iris.data 文件放在 iris.ipynb 所在的目录中。将以下代码复制到 Jupyter 笔记本文件中。
iris.ipynb
计算机编程语言
import pandas as pd
import numpy as np
import tensorflow as tf
from sklearn.preprocessing import LabelEncoder
from keras.utils import to_categorical

# reading the csb into data frame
df = pd.read_csv('iris.data')

# specifying the columns values into x and y variable
# iloc range based selecting 0 to 4 (4) values
X = df.iloc[:, :4].values
y = df.iloc[:, 4].values

# normalizing labels
le = LabelEncoder()

# performing fit and transform data on y
y = le.fit_transform(y)

y = to_categorical(y)

from tensorflow.keras.layers import Dense
from tensorflow.keras.models import Sequential

model = Sequential()

# input layer
# passing number neurons =64
# relu activation
# shape of neuron 4
model.add(Dense(64, activation='relu', input_shape=[4]))

# processing layer
# adding another denser layer of size 64
model.add(Dense(64))

# creating 3 output neuron
model.add(Dense(3, activation='softmax'))

# compiling model
model.compile(optimizer='sgd', loss='categorical_crossentropy',
              metrics=['acc'])

# training the model for fixed number of iterations (epoches)
model.fit(X, y, epochs=200)

from tensorflow import lite
converter = lite.TFLiteConverter.from_keras_model(model)

tfmodel = converter.convert()

open('iris.tflite', 'wb').write(tfmodel)
第三步:
执行完 行后打开(' iris.tflite ',' wb ')。write(tfmodel) 一个名为 iris.tflite 的新文件将在 iris.data 所在的目录中创建。
A) 打开安卓工作室。创建一个新的 kotlin-android 项目。(创建项目可以参考这里的)。
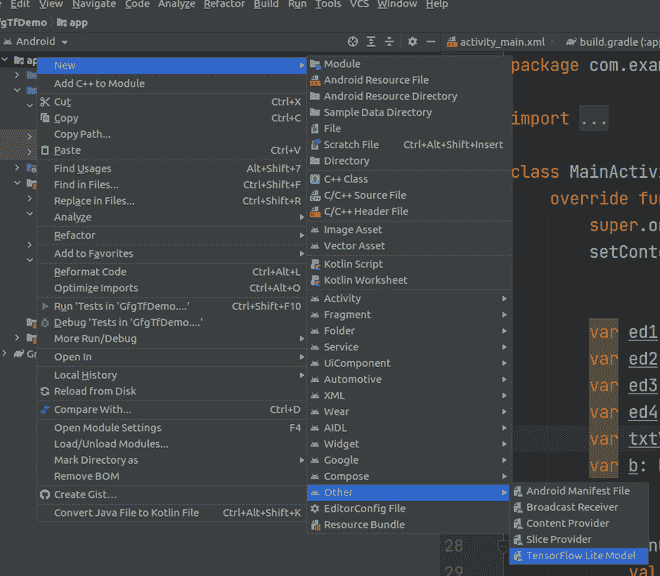
B) 右键点击 app >新增>其他> TensorFlow Lite 模型
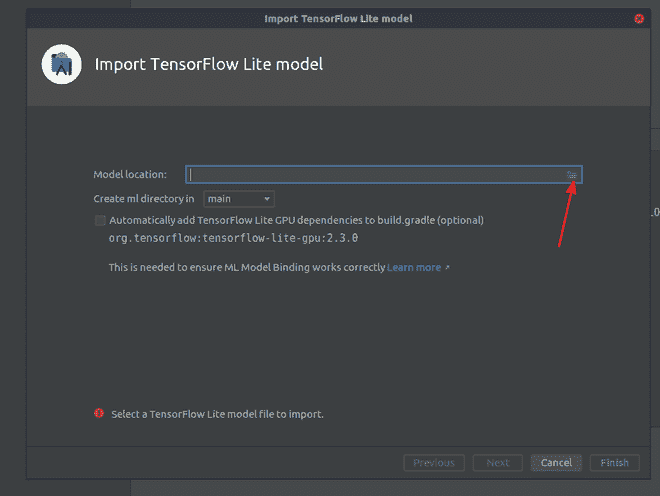
C) 点击文件夹图标。
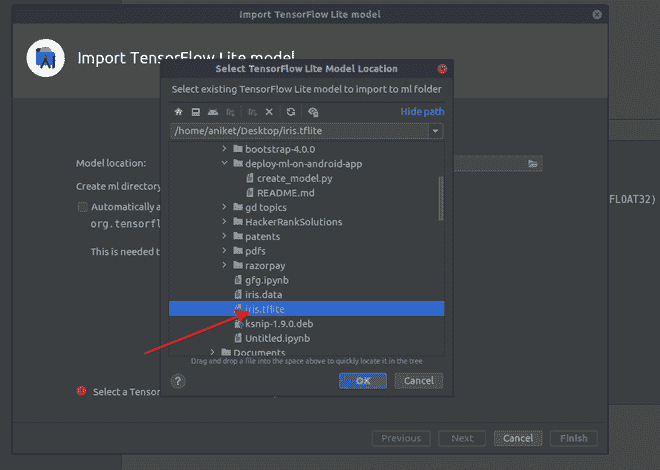
D) 导航至 iris.tflite 文件
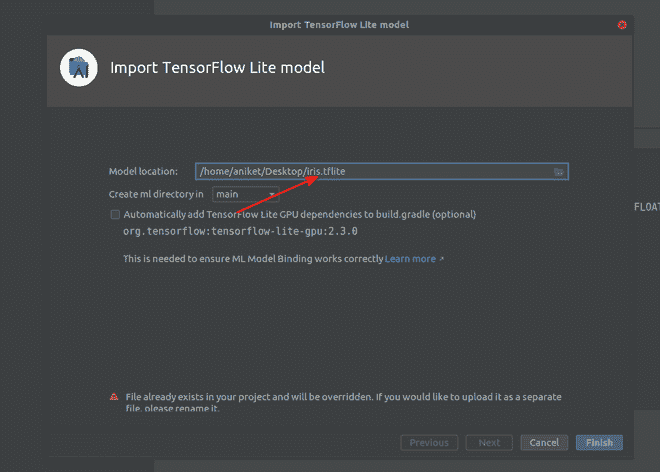
E) 点击确定
F) 点击完成后你的模型会是这个样子。(加载可能需要一些时间)。

复制代码并粘贴到 MainActivity.kt 中一个按钮的点击监听器中(如下所示)。
第五步:为预测创建 XML 布局
导航到应用程序> res >布局> activity_main.xml 并将下面的代码添加到该文件中。下面是 activity_main.xml 文件的代码。
可扩展标记语言
<?xml version="1.0" encoding="utf-8"?>
<androidx.constraintlayout.widget.ConstraintLayout
    xmlns:android="http://schemas.android.com/apk/res/android"
    xmlns:app="http://schemas.android.com/apk/res-auto"
    xmlns:tools="http://schemas.android.com/tools"
    android:layout_width="match_parent"
    android:layout_height="match_parent"
    tools:context=".MainActivity">

    <ScrollView
        android:layout_width="match_parent"
        android:layout_height="match_parent"
        android:layout_marginBottom="50dp">

        <LinearLayout
            android:layout_width="match_parent"
            android:layout_height="match_parent"
            android:orientation="vertical">

            <!-- creating  edittexts for input-->
            <EditText
                android:id="@+id/tf1"
                android:layout_width="175dp"
                android:layout_height="wrap_content"
                android:layout_gravity="center"
                android:layout_marginTop="70dp"
                android:ems="10"
                android:inputType="numberDecimal" />

            <EditText
                android:id="@+id/tf2"
                android:layout_width="175dp"
                android:layout_height="wrap_content"
                android:layout_gravity="center"
                android:layout_marginTop="20dp"
                android:ems="10"
                android:inputType="numberDecimal" />

            <EditText
                android:id="@+id/tf3"
                android:layout_width="175dp"
                android:layout_height="wrap_content"
                android:layout_gravity="center"
                android:layout_marginTop="20dp"
                android:ems="10"
                android:inputType="numberDecimal" />

            <EditText
                android:id="@+id/tf4"
                android:layout_width="175dp"
                android:layout_height="wrap_content"
                android:layout_gravity="center"
                android:layout_marginTop="20dp"
                android:ems="10"
                android:inputType="numberDecimal" />

            <!-- creating  Button for input-->
            <!-- after clicking on button we will see prediction-->
            <Button
                android:id="@+id/button"
                android:layout_width="wrap_content"
                android:layout_height="wrap_content"
                android:layout_gravity="center"
                android:layout_marginTop="100dp"
                android:text="Button"
                app:layout_constraintBottom_toTopOf="@+id/textView"
                app:layout_constraintEnd_toEndOf="parent"
                app:layout_constraintHorizontal_bias="0.0"
                app:layout_constraintStart_toStartOf="parent" />

            <!-- creating  textview on which we will see prediction-->
            <TextView
                android:id="@+id/textView"
                android:layout_width="wrap_content"
                android:layout_height="wrap_content"
                android:layout_gravity="center"
                android:layout_marginTop="50dp"
                android:text="TextView"
                android:textSize="20dp"
                app:layout_constraintEnd_toEndOf="parent" />
        </LinearLayout>
    </ScrollView>
</androidx.constraintlayout.widget.ConstraintLayout>
第六步:使用 主活动文件
转到 MainActivity.kt 文件,参考以下代码。下面是 MainActivity.kt 文件的代码。代码中添加了注释,以更详细地理解代码。
我的锅
import androidx.appcompat.app.AppCompatActivity
import android.os.Bundle
import android.view.View
import android.widget.Button
import android.widget.EditText
import android.widget.TextView
import com.example.gfgtfdemo.ml.Iris
import org.tensorflow.lite.DataType
import org.tensorflow.lite.support.tensorbuffer.TensorBuffer
import java.nio.ByteBuffer

class MainActivity : AppCompatActivity() {
    override fun onCreate(savedInstanceState: Bundle?) {
        super.onCreate(savedInstanceState)
        setContentView(R.layout.activity_main)

        // getting the object edit texts
        var ed1: EditText = findViewById(R.id.tf1);
        var ed2: EditText = findViewById(R.id.tf2);
        var ed3: EditText = findViewById(R.id.tf3);
        var ed4: EditText = findViewById(R.id.tf4);

        // getting the object of result textview
        var txtView: TextView = findViewById(R.id.textView);
        var b: Button = findViewById<Button>(R.id.button);

        // registering listener
        b.setOnClickListener(View.OnClickListener {

            val model = Iris.newInstance(this)

            // getting values from edit text and converting to float
            var v1: Float = ed1.text.toString().toFloat();
            var v2: Float = ed2.text.toString().toFloat();
            var v3: Float = ed3.text.toString().toFloat();
            var v4: Float = ed4.text.toString().toFloat();

            /*************************ML MODEL CODE STARTS HERE******************/

              // creating byte buffer which will act as input for model
            var byte_buffer: ByteBuffer = ByteBuffer.allocateDirect(4 * 4)
            byte_buffer.putFloat(v1)
            byte_buffer.putFloat(v2)
            byte_buffer.putFloat(v3)
            byte_buffer.putFloat(v4)

            // Creates inputs for reference.
            val inputFeature0 = TensorBuffer.createFixedSize(intArrayOf(1, 4), DataType.FLOAT32)
            inputFeature0.loadBuffer(byte_buffer)

            // Runs model inference and gets result.
            val outputs = model.process(inputFeature0)
            val outputFeature0 = outputs.outputFeature0AsTensorBuffer.floatArray

            // setting the result to the output textview
            txtView.setText(
                "Iris-setosa : =" + outputFeature0[0].toString() + "\n" +
                "Iris-versicolor : =" + outputFeature0[1].toString() + "\n" +
                "Iris-virginica: =" +  outputFeature0[2].toString()
            )

            // Releases model resources if no longer used.
            model.close()
        })
    }
}
输出:
你可以从这里下载这个项目。
