如何在安卓中切换密码可见性?
正如我们所知,切换意味着通过按一个按钮在两个不同的选项之间切换。因此,在本文中,我们将看到如何通过按下单个按钮(这里是眼睛按钮)来更改密码可见性,即输入密码类型后,我们还可以启用一个图标,该图标可以显示或隐藏用户正在键入的文本。为了实现这个项目,我们将使用文本输入布局(线性布局的子级),这是安卓材料设计库附带的设计组件。由于我们将输入密码,将使用文本输入文本而不是普通的编辑文本,因为文本输入文本是编辑文本的子类,文本编辑文本是文本输入布局的子类。有五个 XML 属性与密码可见性切换相关联。
- passwordtogleenabled:这个属性的值不是真就是假,所以当我们想要密码可转换的时候,就应该给这个属性赋予真值。
- passwordToggleTint: 允许为颜色赋予可见性切换图标。
- passwordToggleTintMode: 允许给切换图标不同的背景模式。
- passwordtoglawlable:允许我们给切换图标一个不同的图标,而不是默认的眼睛图像。
- passwordToggleContentDescription:允许我们对切换图标进行描述。
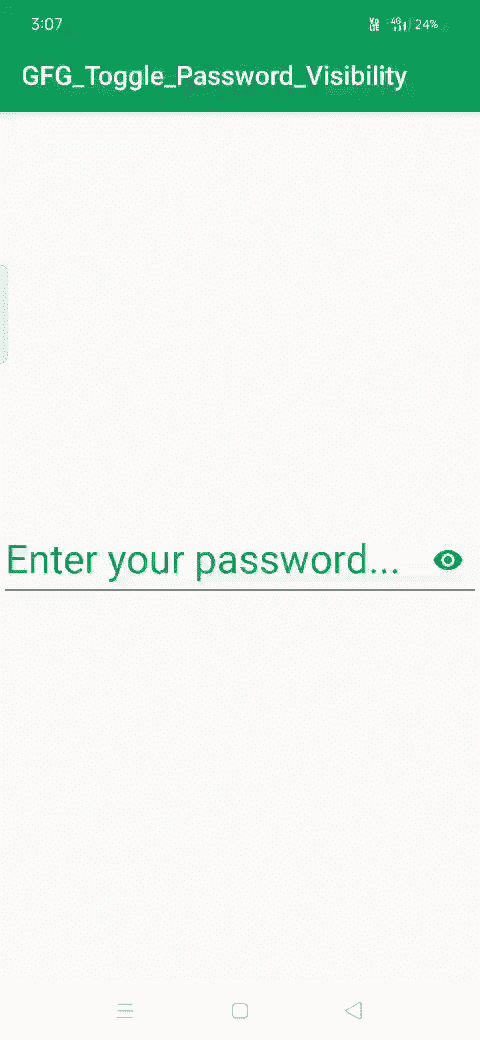
下面给出了一个 GIF 示例,来了解一下在本文中要做什么。请注意,我们将使用 Kotlin 语言来实现这个项目。
分步实施
第一步:创建新项目
要在安卓工作室创建新项目,请参考如何在安卓工作室创建/启动新项目。注意选择科特林作为编程语言。
步骤 2:使用 activity_main.xml 文件
现在转到代表应用程序用户界面的 activity_main.xml 文件。下面是 activity_main.xml 文件的代码。代码中添加了注释,以更详细地理解代码。
可扩展标记语言
<!--xml code for the project-->
<?xml version="1.0" encoding="utf-8"?>
<androidx.constraintlayout.widget.ConstraintLayout
    xmlns:android="http://schemas.android.com/apk/res/android"
    xmlns:app="http://schemas.android.com/apk/res-auto"
    xmlns:tools="http://schemas.android.com/tools"
    android:layout_width="match_parent"
    android:layout_height="match_parent"
    tools:context=".MainActivity">

<!--TextInput layout which acts as a wrapper to the edit text-->
<com.google.android.material.textfield.TextInputLayout
        android:layout_width="wrap_content"
        android:layout_height="wrap_content"
        android:textColorHint="#0F9D58"
        app:hintTextAppearance="@style/TextAppearance.AppCompat.Large"
        android:hint="Enter your password..."
        <!--Enabling the password toggle>
        app:passwordToggleEnabled="true"
        <!--applying the tint to the password visibility toggle-->
        app:passwordToggleTint="@color/colorPrimary"

        android:scrollbarSize="25dp"
        app:layout_constraintBottom_toBottomOf="parent"
        app:layout_constraintLeft_toLeftOf="parent"
        app:layout_constraintRight_toRightOf="parent"
        app:layout_constraintTop_toTopOf="parent">

        <!--Using the TextInputEditText,which is
            same as the edit text,but remember-->
        <!--that we need to use TextInputEditText
            with TextInputLayout-->
 <com.google.android.material.textfield.TextInputEditText
            android:layout_width="match_parent"
            android:layout_height="match_parent"
            android:textSize="30dp"
            android:inputType="textPassword"
            android:ems="15"/>

 </com.google.android.material.textfield.TextInputLayout>

</androidx.constraintlayout.widget.ConstraintLayout>
步骤 3:使用构建. gradle(应用程序级文件)
在相关性部分导入对材料组件的相关性。
依赖项{
// …
实现' com . Google . Android . material:material:
' // …
}
第 4 步:使用 MainActivity.kt 文件
转到 MainActivity.kt 文件,并参考以下代码。下面是 MainActivity.kt 文件的代码。代码中添加了注释,以更详细地理解代码。由于在这个项目中没有需要执行的逻辑,MainActivity 不包含任何代码。
我的锅
import androidx.appcompat.app.AppCompatActivity
import android.os.Bundle

class MainActivity : AppCompatActivity() {
    override fun onCreate(savedInstanceState: Bundle?) {
        super.onCreate(savedInstanceState)
        setContentView(R.layout.activity_main)
    }
}
