使用共享视图模型
在安卓系统中进行片段到片段的通信
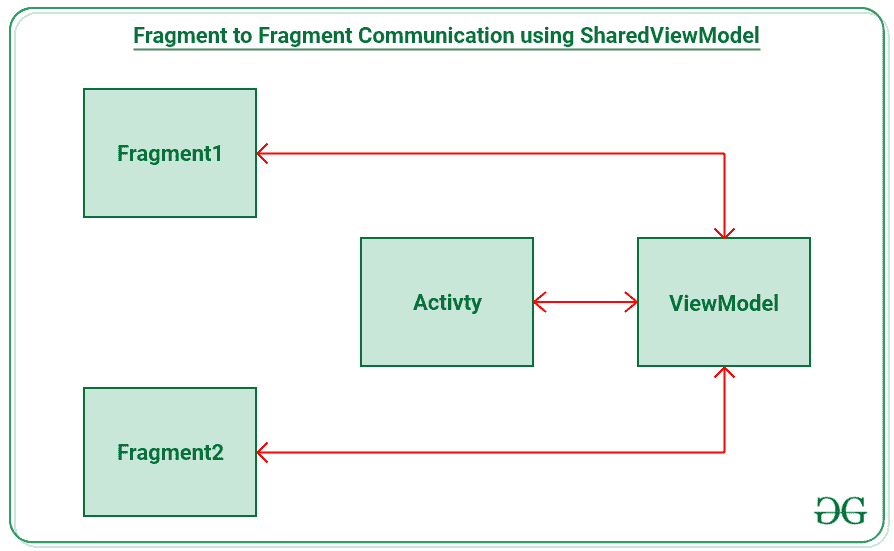
如果一个活动中有两个或多个片段,它们需要在它们之间进行通信和共享数据。在两个片段之间共享数据的传统方式是使用一个接口实现回调,这个接口很麻烦,可能会抛出异常。但是现代的方法是使用共享视图模型。因此,在本文中,已经演示了如何使用共享视图模型在片段之间进行通信。请看下图,了解讨论概况。
注:此讨论用 Kotlin 编程语言实现。
先决条件
实现片段间通信的步骤
第一步:创建一个空的活动项目
创建一个空的活动 Android Studio 项目,并选择 Kotlin 作为编程语言。参考安卓|如何在安卓工作室创建/启动新项目?。
步骤 2:添加所需的依赖关系
依赖项包括视图模型和实时数据。因此,在应用程序级的 Gradle 文件中添加以下依赖项并同步项目。
// lifecycle_version 和架构版本可能会有所不同 def lifecycle_version = "2.3.1 "
def arch_version = "2.1.0 "
// ViewModel
实现“androidx . life cycle:life cycle-view model-ktx:$ life cycle _ version”
实时数据
实现“androidx . life cycle:life cycle-live data-ktx:$ life cycle _ version”
//仅生命周期(无视图模型或实时数据)
实现“androidx . life cycle:life cycle-runtime-ktx:$ life cycle _ version”
//架构生命周期扩展
实现“androidx . life cycle:life cycle-extensions:$ arch _ version”
第三步:使用 activity_main.xml 文件
应用程序的主布局包含两个框架布局,它们包含两个片段。为了实现相同的功能,在 activity_main.xml 文件中调用以下代码。
可扩展标记语言
<?xml version="1.0" encoding="utf-8"?>
<androidx.constraintlayout.widget.ConstraintLayout
    xmlns:android="http://schemas.android.com/apk/res/android"
    xmlns:app="http://schemas.android.com/apk/res-auto"
    xmlns:tools="http://schemas.android.com/tools"
    android:layout_width="match_parent"
    android:layout_height="match_parent"
    tools:context=".MainActivity"
    tools:ignore="HardcodedText">

    <TextView
        android:id="@+id/textView"
        style="@style/TextAppearance.MaterialComponents.Headline6"
        android:layout_width="wrap_content"
        android:layout_height="wrap_content"
        android:layout_marginStart="16dp"
        android:layout_marginTop="16dp"
        android:text="Fragment 1:"
        app:layout_constraintStart_toStartOf="parent"
        app:layout_constraintTop_toTopOf="parent" />

    <FrameLayout
        android:id="@+id/fragment_1_holder"
        android:layout_width="match_parent"
        android:layout_height="wrap_content"
        android:layout_marginStart="16dp"
        android:layout_marginTop="8dp"
        android:layout_marginEnd="16dp"
        app:layout_constraintEnd_toEndOf="parent"
        app:layout_constraintHorizontal_bias="0.0"
        app:layout_constraintStart_toStartOf="parent"
        app:layout_constraintTop_toBottomOf="@+id/textView" />

    <View
        android:id="@+id/view"
        android:layout_width="match_parent"
        android:layout_height="1dp"
        android:layout_marginTop="16dp"
        android:background="@color/green_700"
        app:layout_constraintEnd_toEndOf="parent"
        app:layout_constraintStart_toStartOf="parent"
        app:layout_constraintTop_toBottomOf="@+id/fragment_1_holder" />

    <TextView
        android:id="@+id/textView2"
        style="@style/TextAppearance.MaterialComponents.Headline6"
        android:layout_width="wrap_content"
        android:layout_height="wrap_content"
        android:layout_marginStart="16dp"
        android:layout_marginTop="16dp"
        android:text="Fragment 2: "
        app:layout_constraintStart_toStartOf="parent"
        app:layout_constraintTop_toBottomOf="@+id/view" />

    <FrameLayout
        android:id="@+id/fragment_2_holder"
        android:layout_width="match_parent"
        android:layout_height="wrap_content"
        android:layout_marginStart="16dp"
        android:layout_marginTop="8dp"
        android:layout_marginEnd="16dp"
        app:layout_constraintEnd_toEndOf="parent"
        app:layout_constraintHorizontal_bias="0.0"
        app:layout_constraintStart_toStartOf="parent"
        app:layout_constraintTop_toBottomOf="@+id/textView2" />

</androidx.constraintlayout.widget.ConstraintLayout>
第四步:实现共享视图模型
在共享视图模型. kt 文件中有一个可变的字符序列数据,用于设置编辑文本的数据。两个函数 setData 和 getData 用于一旦编辑文本中的数据发生变化,就更新可变的实时数据。
若要实现相同的,请调用以下代码。
我的锅
import androidx.lifecycle.MutableLiveData
import androidx.lifecycle.ViewModel

class SharedViewModel : ViewModel() {

    // Mutable LiveData which observed by LiveData
      // and updated to EditTexts when it is changed.
    private val mutableLiveData: MutableLiveData<CharSequence> = MutableLiveData()

    // function to set the changed
      // data from the EditTexts
    fun setData(input: CharSequence) {
        mutableLiveData.value = input
    }

    // function to get the changed data from the EditTexts
    fun getData(): MutableLiveData<CharSequence> = mutableLiveData
}
第五步:创建 2 个片段
- 创建两个片段,它们各自的布局分别命名为片段 1.kt 和片段 2.kt 。
- 对于每个片段的布局,它包含一个 EditText 来获取片段 2 要发送的数据,以及一个按钮,当单击该按钮时,它会将数据共享给另一个片段。
- 要实现片段 1 的布局,请在 fragment_1.xml 文件中调用以下代码
可扩展标记语言
<?xml version="1.0" encoding="utf-8"?>
<RelativeLayout
    xmlns:android="http://schemas.android.com/apk/res/android"
    xmlns:tools="http://schemas.android.com/tools"
    android:layout_width="match_parent"
    android:layout_height="match_parent"
    android:clipToPadding="false"
    android:padding="4dp"
    tools:context=".Fragment1"
    tools:ignore="HardcodedText">

    <com.google.android.material.textfield.TextInputLayout
        android:id="@+id/edit_text_layout_1"
        android:layout_width="match_parent"
        android:layout_height="wrap_content">

        <com.google.android.material.textfield.TextInputEditText
            android:id="@+id/edit_text_from_fragment_1"
            android:layout_width="match_parent"
            android:layout_height="wrap_content"
            android:hint="Enter the data" />

    </com.google.android.material.textfield.TextInputLayout>

    <Button
        android:id="@+id/send_button_fragment_1"
        android:layout_width="wrap_content"
        android:layout_height="wrap_content"
        android:layout_below="@id/edit_text_layout_1"
        android:layout_alignParentEnd="true"
        android:layout_marginTop="8dp"
        android:layout_marginEnd="16dp"
        android:text="Send Data to Fragment 2" />

</RelativeLayout>
要实现片段 2 的布局,在片段 _2.xml 文件中调用以下代码。
可扩展标记语言
<?xml version="1.0" encoding="utf-8"?>
<RelativeLayout
    xmlns:android="http://schemas.android.com/apk/res/android"
    xmlns:tools="http://schemas.android.com/tools"
    android:layout_width="match_parent"
    android:layout_height="match_parent"
    android:clipToPadding="false"
    android:padding="4dp"
    tools:context=".Fragment2"
    tools:ignore="HardcodedText">

    <com.google.android.material.textfield.TextInputLayout
        android:id="@+id/edit_text_layout_2"
        android:layout_width="match_parent"
        android:layout_height="wrap_content">

        <com.google.android.material.textfield.TextInputEditText
            android:id="@+id/edit_text_from_fragment_2"
            android:layout_width="match_parent"
            android:layout_height="wrap_content"
            android:hint="Enter the data" />

    </com.google.android.material.textfield.TextInputLayout>

    <Button
        android:id="@+id/send_button_fragment_2"
        android:layout_width="wrap_content"
        android:layout_height="wrap_content"
        android:layout_below="@id/edit_text_layout_2"
        android:layout_alignParentEnd="true"
        android:layout_marginTop="8dp"
        android:layout_marginEnd="16dp"
        android:text="Send Data to Fragment 1" />

</RelativeLayout>
步骤 6:在 Fragment.kt 文件内创建共享视图模型的实例
- 创建活动时,需要创建共享视图模型类型的视图模型实例。
- 因此,需要在每个片段中覆盖 onActivityCreated() 方法。
- 这是因为当我们看到片段的生命周期时,视图是在调用 onCreateView() 和执行 onCreateView()后调用onprivatycreated()回调后创建和更新的。因此,实时数据可以跟踪用户界面元素更新了哪些元素。请看下面这个片段活动生命周期的图表。

要在两个片段中实现相同的,请调用片段 1.kt 中的以下代码。
我的锅
import android.os.Bundle
import android.text.Editable
import androidx.fragment.app.Fragment
import android.view.LayoutInflater
import android.view.View
import android.view.ViewGroup
import android.widget.Button
import android.widget.EditText
import androidx.lifecycle.Observer
import androidx.lifecycle.ViewModelProviders

class Fragment1 : Fragment() {

    private var sharedViewModelInstance: SharedViewModel? = null

    private var editTextFromFragment1: EditText? = null

    override fun onCreateView(
            inflater: LayoutInflater, container: ViewGroup?,
            savedInstanceState: Bundle?
    ): View? {
        val view: View = inflater.inflate(R.layout.fragment_1, container, false)

        val sendDataButton: Button = view.findViewById(R.id.send_button_fragment_1)
        editTextFromFragment1 = view.findViewById(R.id.edit_text_from_fragment_1)

        // as soon as the button is clicked
          // send the data to ViewModel
        // and the Live data will take care of
          // updating the data inside another Fragment
        sendDataButton.setOnClickListener {
            sharedViewModelInstance?.setData(editTextFromFragment1!!.text)
        }

        return view
    }

    override fun onActivityCreated(savedInstanceState: Bundle?) {
        super.onActivityCreated(savedInstanceState)

        // create instances of the shared view model
          // when the activity is created
        sharedViewModelInstance = ViewModelProviders.of(activity!!).get(SharedViewModel::class.java)

        // observe the data inside the view model that
          // is mutable live of type CharSequence and
          // set the data for edit text
        sharedViewModelInstance!!.getData().observe(viewLifecycleOwner, Observer {
            editTextFromFragment1!!.text = it as Editable?
        })
    }
}
对于 Fragment2.kt 文件也是如此,调用下面的代码。
我的锅
import android.os.Bundle
import android.text.Editable
import androidx.fragment.app.Fragment
import android.view.LayoutInflater
import android.view.View
import android.view.ViewGroup
import android.widget.Button
import android.widget.EditText
import androidx.lifecycle.Observer
import androidx.lifecycle.ViewModelProviders

class Fragment2 : Fragment() {

    private var sharedViewModelInstance: SharedViewModel? = null

    private var editTextFromFragment2: EditText? = null

    override fun onCreateView(
            inflater: LayoutInflater, container: ViewGroup?,
            savedInstanceState: Bundle?
    ): View? {
        val view: View = inflater.inflate(R.layout.fragment_2, container, false)

        val sendDataButton: Button = view.findViewById(R.id.send_button_fragment_2)
        editTextFromFragment2 = view.findViewById(R.id.edit_text_from_fragment_2)

        // as soon as the button is clicked
          // send the data to ViewModel
        // and the Live data will take care of
          // updating the data inside another Fragment
        sendDataButton.setOnClickListener {
            sharedViewModelInstance?.setData(editTextFromFragment2!!.text)
        }

        return view
    }

    override fun onActivityCreated(savedInstanceState: Bundle?) {
        super.onActivityCreated(savedInstanceState)

        // create instances of the shared view model
          // when the activity is created
        sharedViewModelInstance = ViewModelProviders.of(activity!!).get(SharedViewModel::class.java)

        // observe the data inside the view model that is mutable
          // live of type CharSequence and set the data for edit text
        sharedViewModelInstance!!.getData().observe(viewLifecycleOwner, Observer {
            editTextFromFragment2!!.text = it as Editable?
        })
    }
}
第 7 步:使用 MainActivity.kt 文件填充片段持有者
在 MainActivity.kt 文件中,需要用两个片段填充来自 activity_main.xml、的片段持有者。要实现相同的功能,请在 MainActivity.kt 文件中调用以下代码。
我的锅
import android.os.Bundle
import androidx.appcompat.app.AppCompatActivity
import androidx.fragment.app.FragmentTransaction

class MainActivity : AppCompatActivity() {
    override fun onCreate(savedInstanceState: Bundle?) {
        super.onCreate(savedInstanceState)
        setContentView(R.layout.activity_main)

        val fragmentTransaction: FragmentTransaction = supportFragmentManager.beginTransaction()
        fragmentTransaction.apply {
            add(R.id.fragment_1_holder, Fragment1())
            add(R.id.fragment_2_holder, Fragment2())
            commit()
        }
    }
}
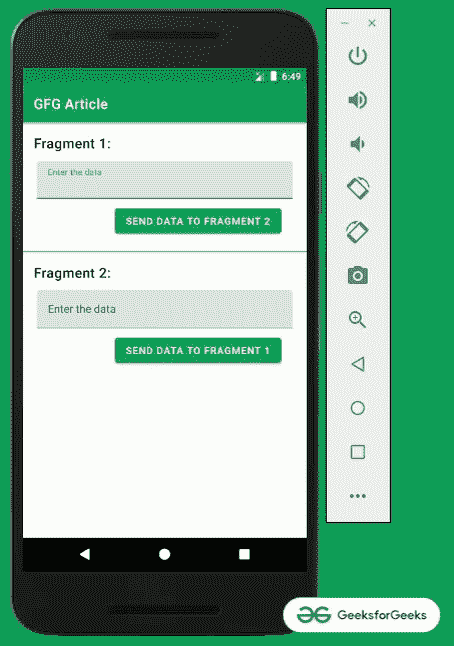
输出:
