如何在安卓中创建动画闪屏?
先决条件: 如何使用 Kotlin 在安卓中创建闪屏?
安卓闪屏是应用程序启动时用户可以看到的第一个屏幕。闪屏是用户对应用程序的第一次体验,这就是为什么它被认为是应用程序中最重要的屏幕之一。用于显示公司标志、公司名称等信息。我们也可以在闪屏中添加一些动画。在本文中,我们将使用科特林制作一个动画闪屏。下面给出一个 GIF 示例,了解一下在这篇 文章中我们要做什么。
创建动画闪屏的步骤
第一步:创建新项目
要在安卓工作室创建新项目,请参考如何在安卓工作室创建/启动新项目。注意选择科特林作为编程语言。
第二步:创建动画文件
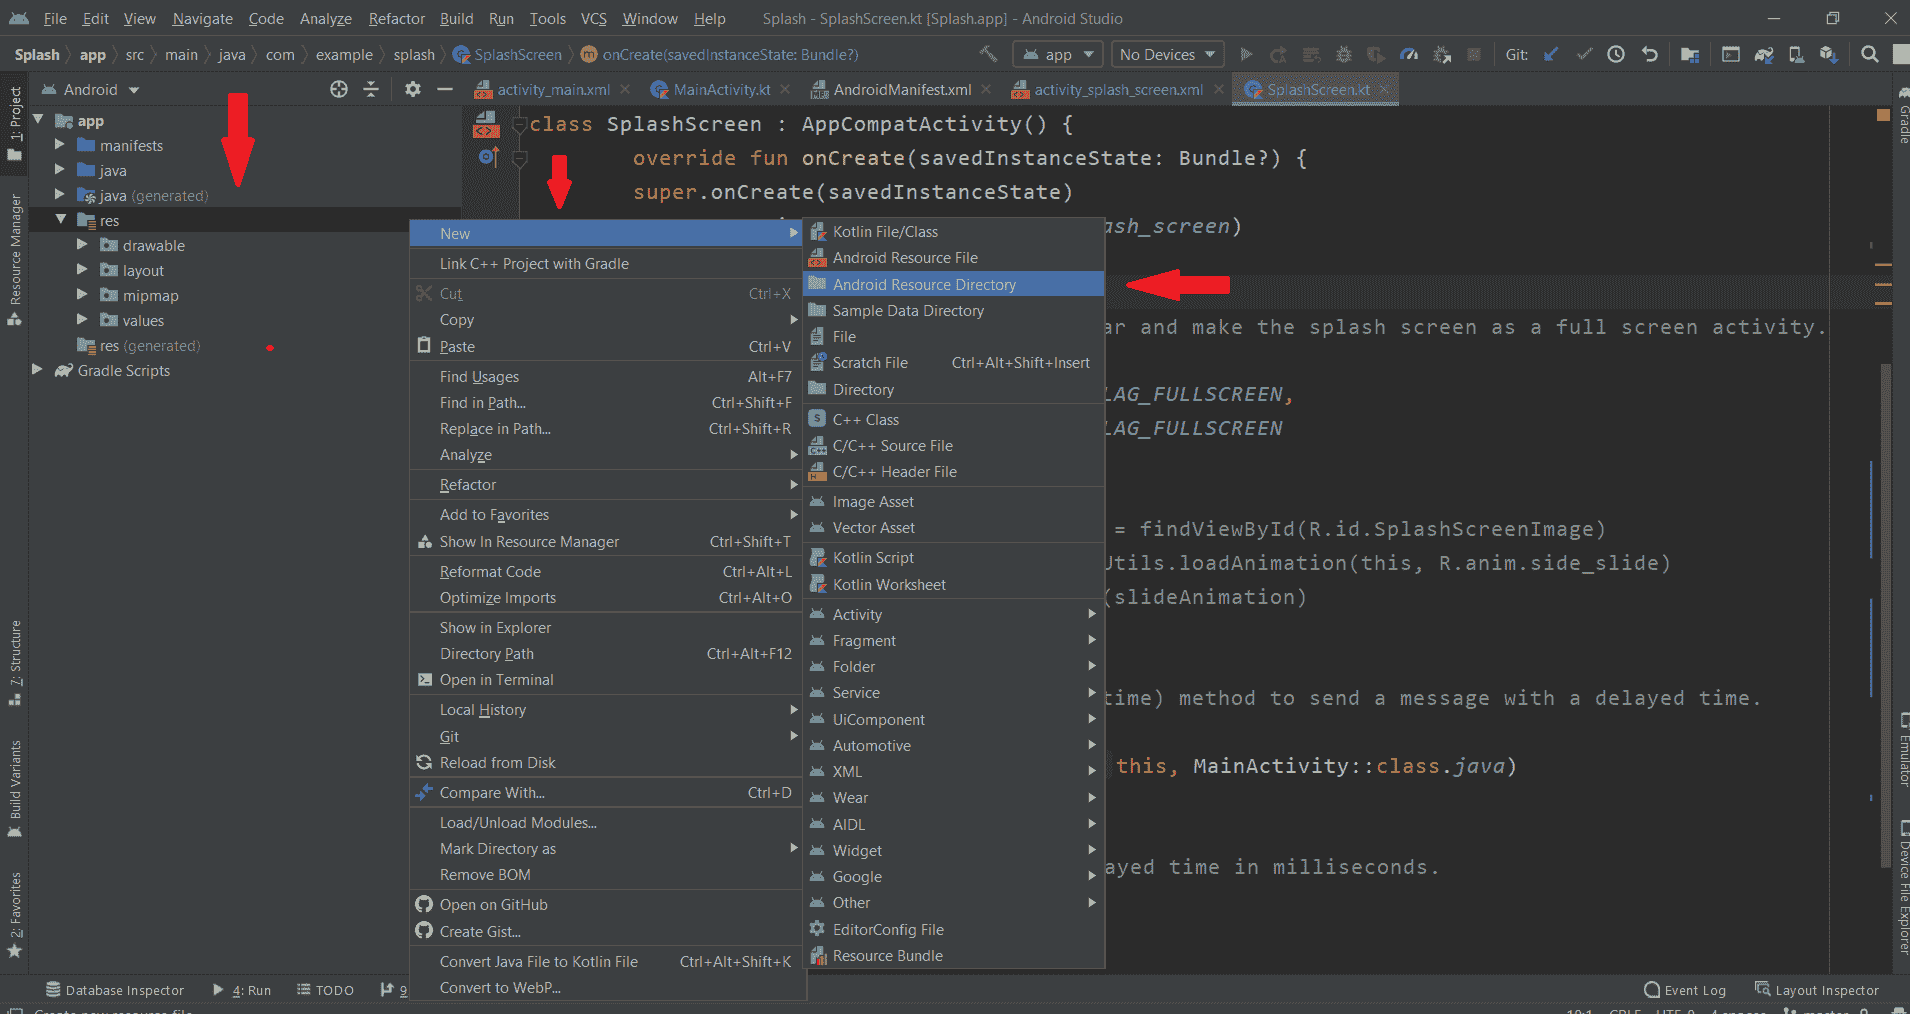
要在 android studio 中创建动画文件,请仔细遵循给定的说明。转到应用程序> res >右键单击>新建>安卓资源目录。
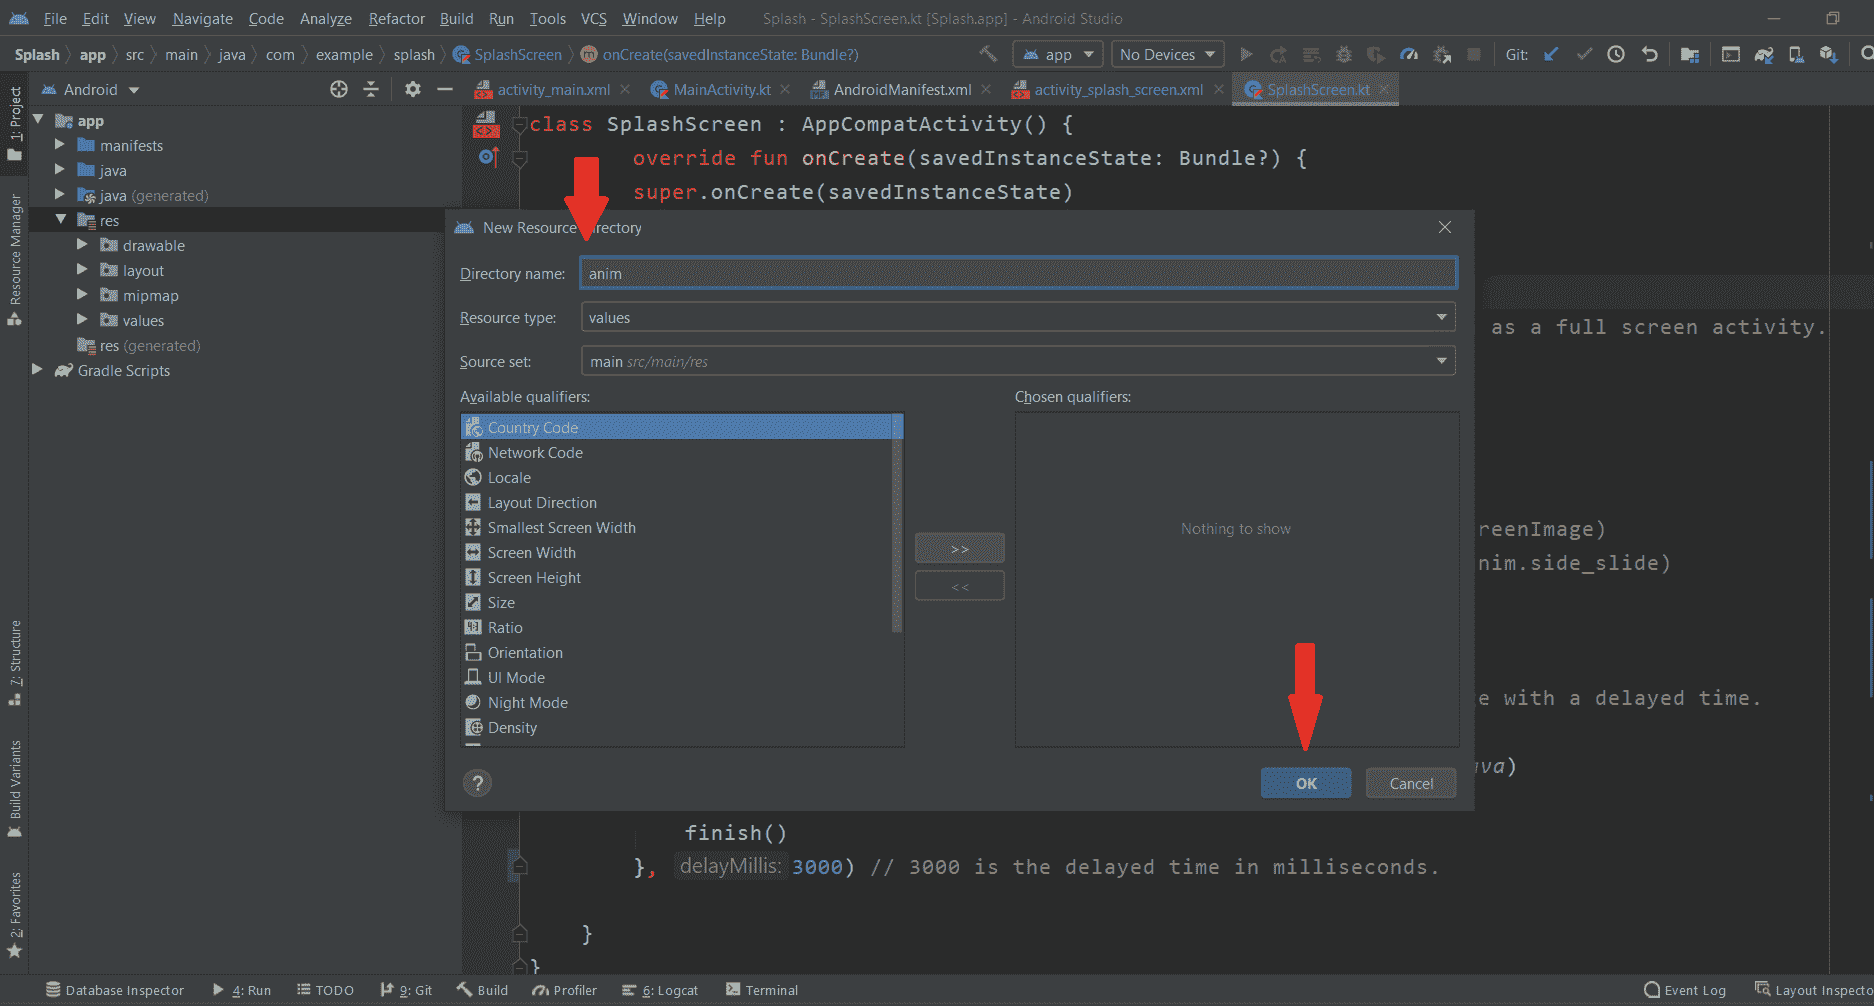
然后将目录名命名为 anim 。然后点击确定。
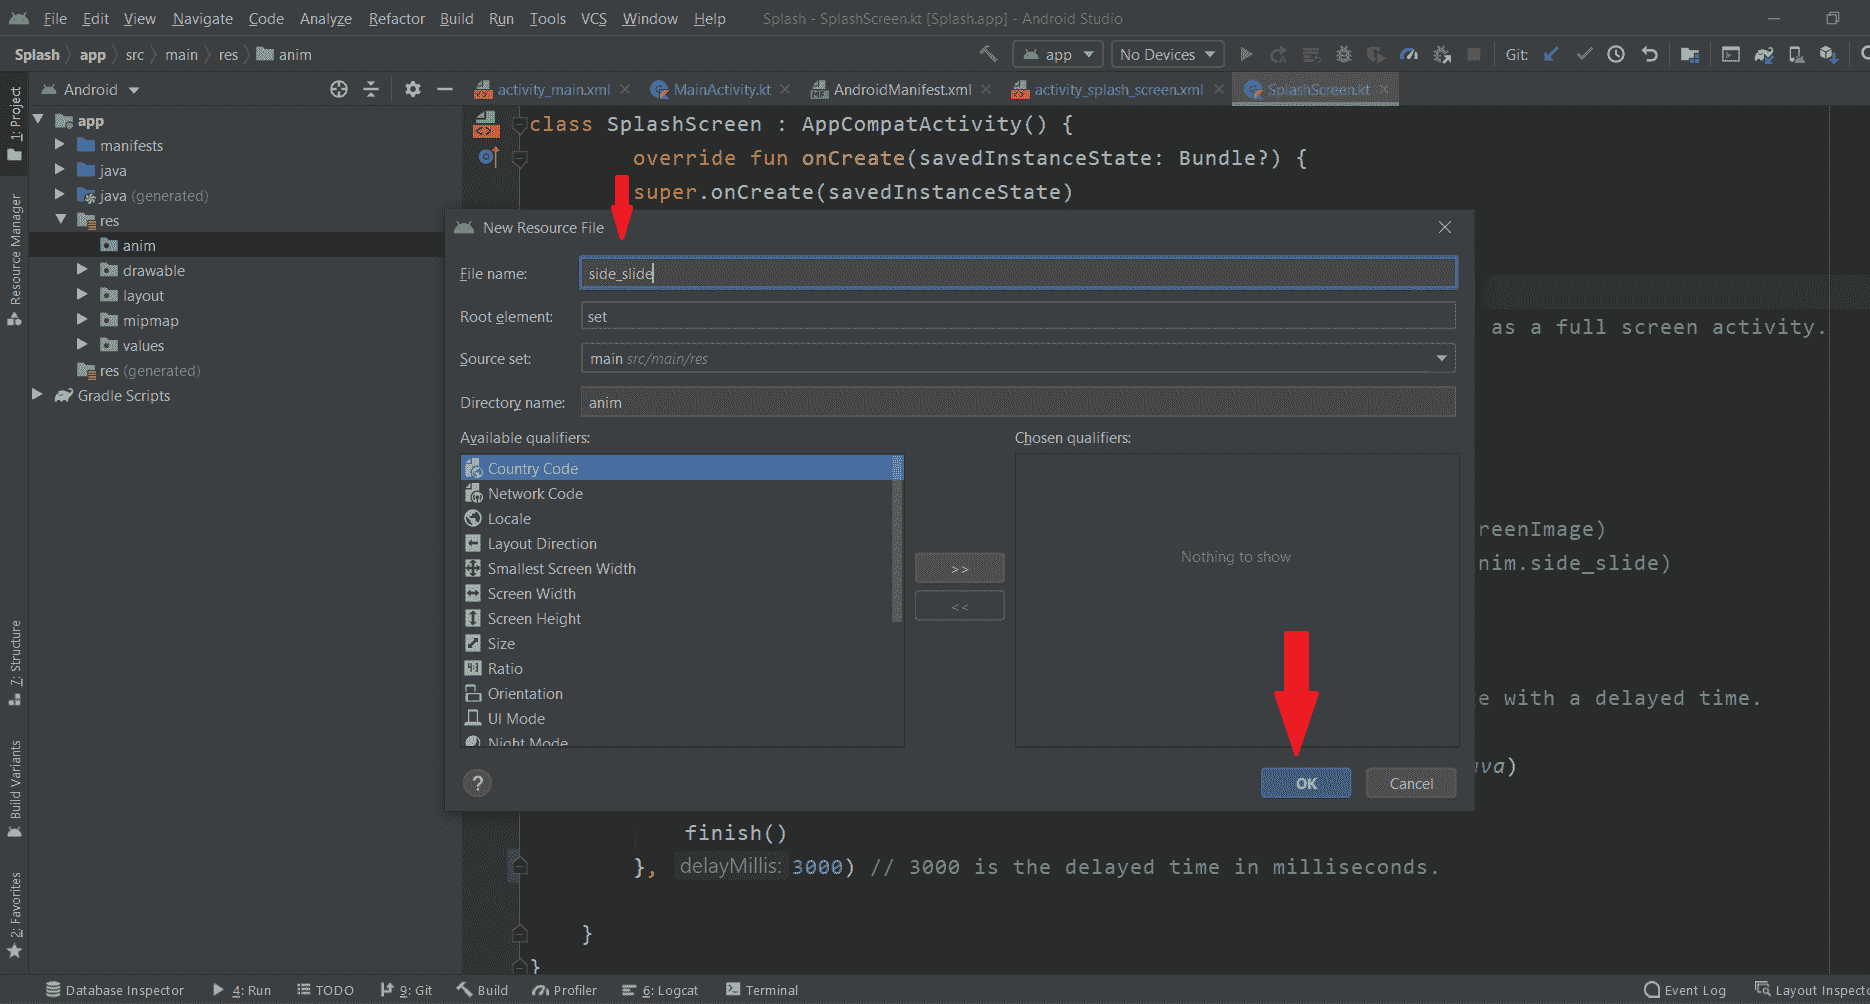
前往动画>右键>新建>动画资源文件
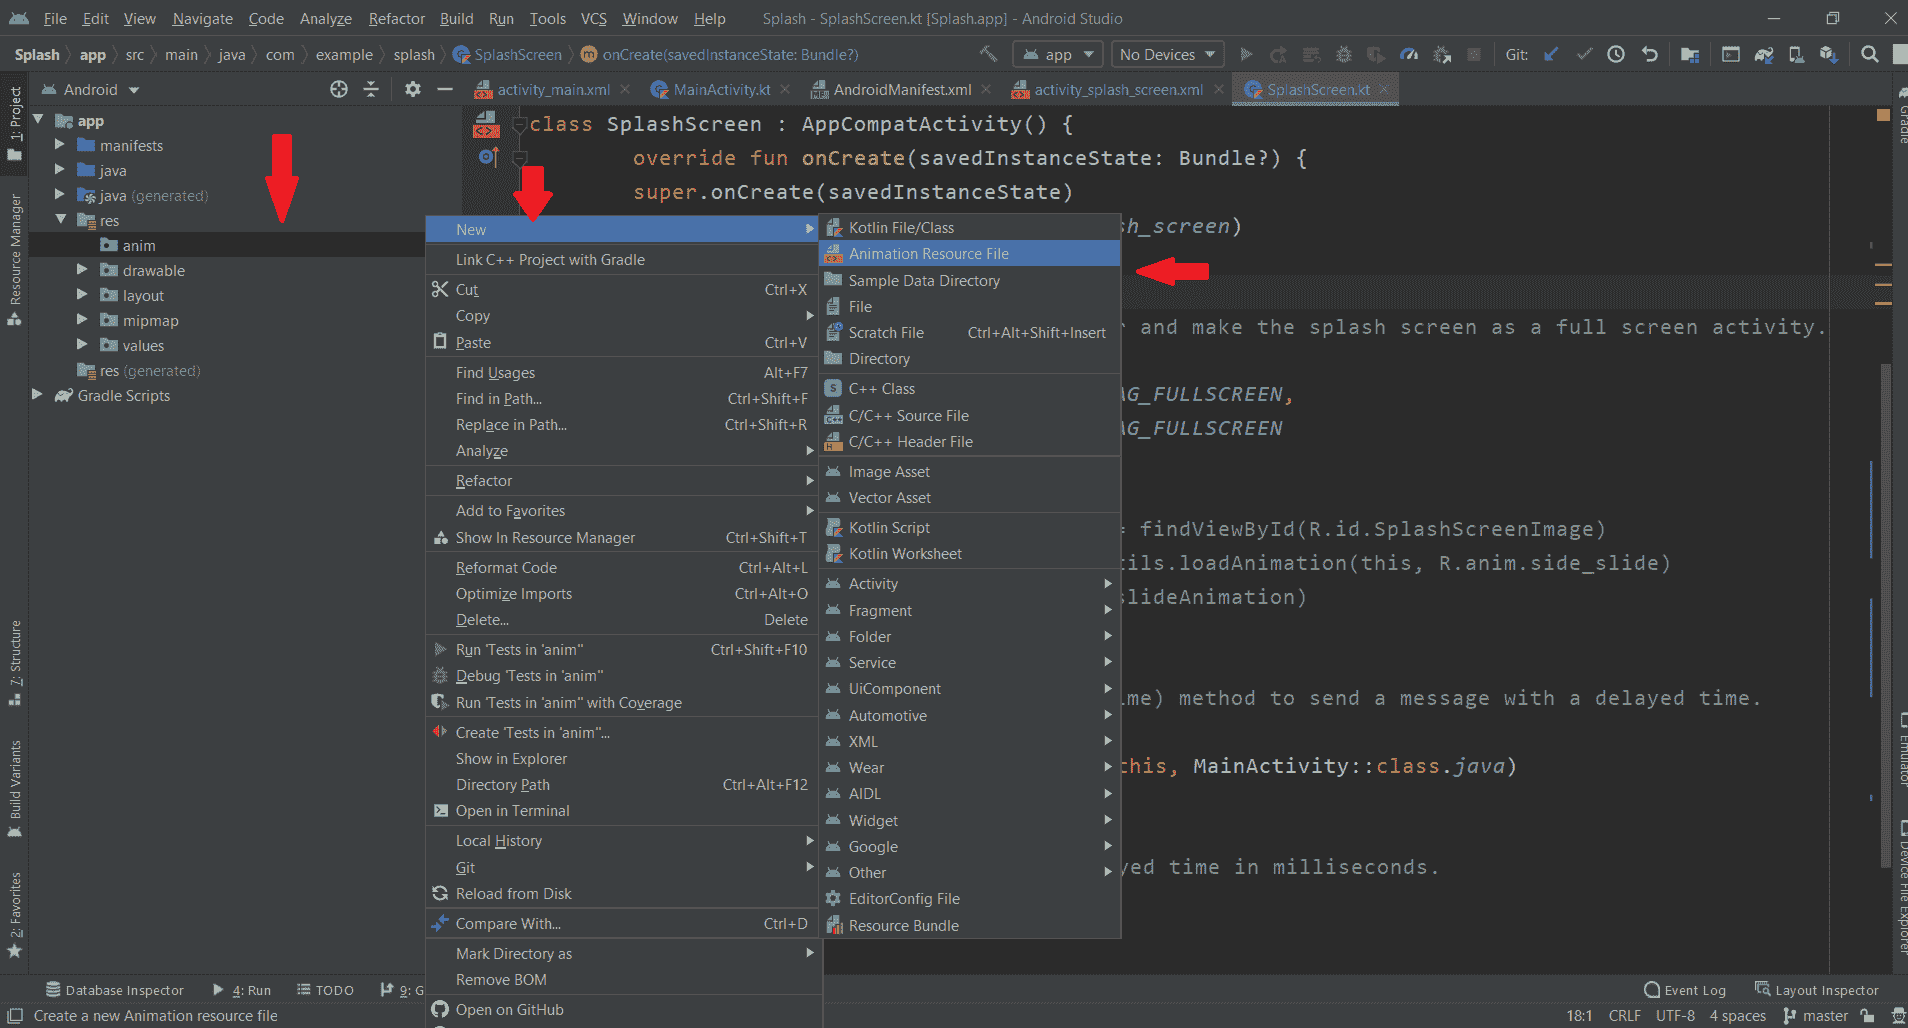
并将文件名命名为侧滑,点击确定。
现在将这段代码添加到动画 XML 文件中。下面是 side_slide.xml 文件的代码。
可扩展标记语言
<?xml version="1.0" encoding="utf-8"?>
<set
    xmlns:android="http://schemas.android.com/apk/res/android">

    <!--THIS CODE IS FOR SIDE ANIMATION-->
    <translate
        android:duration="1500"
        android:fromXDelta="-50%"
        android:fromYDelta="0%" />

    <alpha
        android:duration="1500"
        android:fromAlpha="0.1"
        android:toAlpha="1.0" />
</set>
第三步:创建另一个活动
转到 app > java >第一个包名>右键>新建>活动>清空活动创建另一个活动并命名为闪屏。编辑activity _ splash screen . XML文件,并根据需要在 splash screen 中添加图像、文本。在这里,我们向闪屏添加一个图像。下面是activity _ splash _ screen . XML文件的代码。
可扩展标记语言
<?xml version="1.0" encoding="utf-8"?>
<androidx.constraintlayout.widget.ConstraintLayout
    xmlns:android="http://schemas.android.com/apk/res/android"
    xmlns:app="http://schemas.android.com/apk/res-auto"
    xmlns:tools="http://schemas.android.com/tools"
    android:layout_width="match_parent"
    android:layout_height="match_parent"
    android:background="#fff"
    tools:context=".SplashScreen">

    <!--THIS IS IMAGEVIEW FOR OUR IMAGE IN SPLASH SCREEN-->
    <!--YOU CAN ADD YOUR IMAGE TO DRAWABLES.
        HERE geeksforgeeks IS THE NAME OF IMAGE-->
    <ImageView
        android:id="@+id/SplashScreenImage"
        android:layout_width="300dp"
        android:layout_height="200dp"
        android:src="@drawable/geeksforgeeks"
        app:layout_constraintBottom_toBottomOf="parent"
        app:layout_constraintLeft_toLeftOf="parent"
        app:layout_constraintRight_toRightOf="parent"
        app:layout_constraintTop_toTopOf="parent" />

</androidx.constraintlayout.widget.ConstraintLayout>
转到 SplashScreen.kt 文件,参考以下代码。下面是 SplashScreen.kt 文件的代码。代码中添加了注释,以更详细地理解代码。
我的锅
import android.content.Intent
import android.os.Bundle
import android.os.Handler
import android.view.WindowManager
import android.view.animation.AnimationUtils
import android.widget.ImageView
import androidx.appcompat.app.AppCompatActivity

@Suppress("DEPRECATION")
class SplashScreen : AppCompatActivity() {
    override fun onCreate(savedInstanceState: Bundle?) {
        super.onCreate(savedInstanceState)
        setContentView(R.layout.activity_splash_screen)

        // This is used to hide the status bar and make
        // the splash screen as a full screen activity.
        window.setFlags(
            WindowManager.LayoutParams.FLAG_FULLSCREEN,
            WindowManager.LayoutParams.FLAG_FULLSCREEN
        )

        // HERE WE ARE TAKING THE REFERENCE OF OUR IMAGE
        // SO THAT WE CAN PERFORM ANIMATION USING THAT IMAGE
        val backgroundImage: ImageView = findViewById(R.id.SplashScreenImage)
        val slideAnimation = AnimationUtils.loadAnimation(this, R.anim.side_slide)
        backgroundImage.startAnimation(slideAnimation)

        // we used the postDelayed(Runnable, time) method
        // to send a message with a delayed time.
        Handler().postDelayed({
            val intent = Intent(this, MainActivity::class.java)
            startActivity(intent)
            finish()
        }, 3000) // 3000 is the delayed time in milliseconds.
    }
}
第 4 步:使用 AndroidManifest.xml 文件
转到 AndroidManifest.xml 文件,并在闪屏活动中添加以下代码。这用于隐藏状态栏或操作栏。
安卓:主题= @ style/Theme。AppCompat . light . noictionbar "
另外,在闪屏活动中添加 <意图过滤器> ,使该活动成为开始活动。因此,无论应用程序何时执行,用户都可以在开始时看到闪屏。下面是AnDroidManifest . XML文件的完整代码。
可扩展标记语言
<?xml version="1.0" encoding="utf-8"?>
<manifest xmlns:android="http://schemas.android.com/apk/res/android"
    package="com.example.animatedsplashscreen">

    <application
        android:allowBackup="true"
        android:icon="@mipmap/ic_launcher"
        android:label="@string/app_name"
        android:roundIcon="@mipmap/ic_launcher_round"
        android:supportsRtl="true"
        android:theme="@style/AppTheme">
        <activity android:name=".MainActivity"></activity>
        <activity
            android:name=".SplashScreen"
            android:theme="@style/Theme.AppCompat.Light.NoActionBar">
            <intent-filter>
                <action android:name="android.intent.action.MAIN" />

                <category android:name="android.intent.category.LAUNCHER" />
            </intent-filter>
        </activity>
    </application>

</manifest>
第 5 步:使用 activity_main.xml 文件
转到 activity_main.xml 文件,并添加一个文本,当用户进入 MainActivity 时,该文本将显示“欢迎来到 GeeksforGeeks”。下面是activity _ main . XML文件的代码。
可扩展标记语言
<?xml version="1.0" encoding="utf-8"?>
<androidx.constraintlayout.widget.ConstraintLayout
    xmlns:android="http://schemas.android.com/apk/res/android"
    xmlns:app="http://schemas.android.com/apk/res-auto"
    xmlns:tools="http://schemas.android.com/tools"
    android:layout_width="match_parent"
    android:layout_height="match_parent"
    android:background="#000"
    tools:context=".MainActivity">

    <!-- THIS IS SIMPLE TEXTVIEW-->
    <TextView
        android:layout_width="wrap_content"
        android:layout_height="wrap_content"
        android:text="Welcome To GeeksforGeeks"
        android:textColor="@color/colorAccent"
        android:textSize="20dp"
        app:layout_constraintBottom_toBottomOf="parent"
        app:layout_constraintLeft_toLeftOf="parent"
        app:layout_constraintRight_toRightOf="parent"
        app:layout_constraintTop_toTopOf="parent" />

</androidx.constraintlayout.widget.ConstraintLayout>
第 6 步:使用 MainActivity.kt 文件
在 MainActivity.kt 文件中不要做任何事情,因为我们已经为闪屏创建了一个新的活动。下面是 MainActivity.kt 文件的代码
我的锅
import androidx.appcompat.app.AppCompatActivity
import android.os.Bundle
import android.widget.Toast

class MainActivity : AppCompatActivity() {
    override fun onCreate(savedInstanceState: Bundle?) {
        super.onCreate(savedInstanceState)
        setContentView(R.layout.activity_main)
    }
}
输出
在 Github 上找到这个项目:https://github.com/Gauravverma245/AnimatedSplashScreen
